Appearance
Deploying to Combell Webhosting
Transitioning a Laravel application from a local development environment to a live production server is a critical step in any project's lifecycle. This chapter provides a comprehensive guide to deploying your Vinyl Shop application to Combell's web hosting platform. We will cover server configuration, file uploads, environment setup, and ongoing maintenance.
Free Hosting for Students
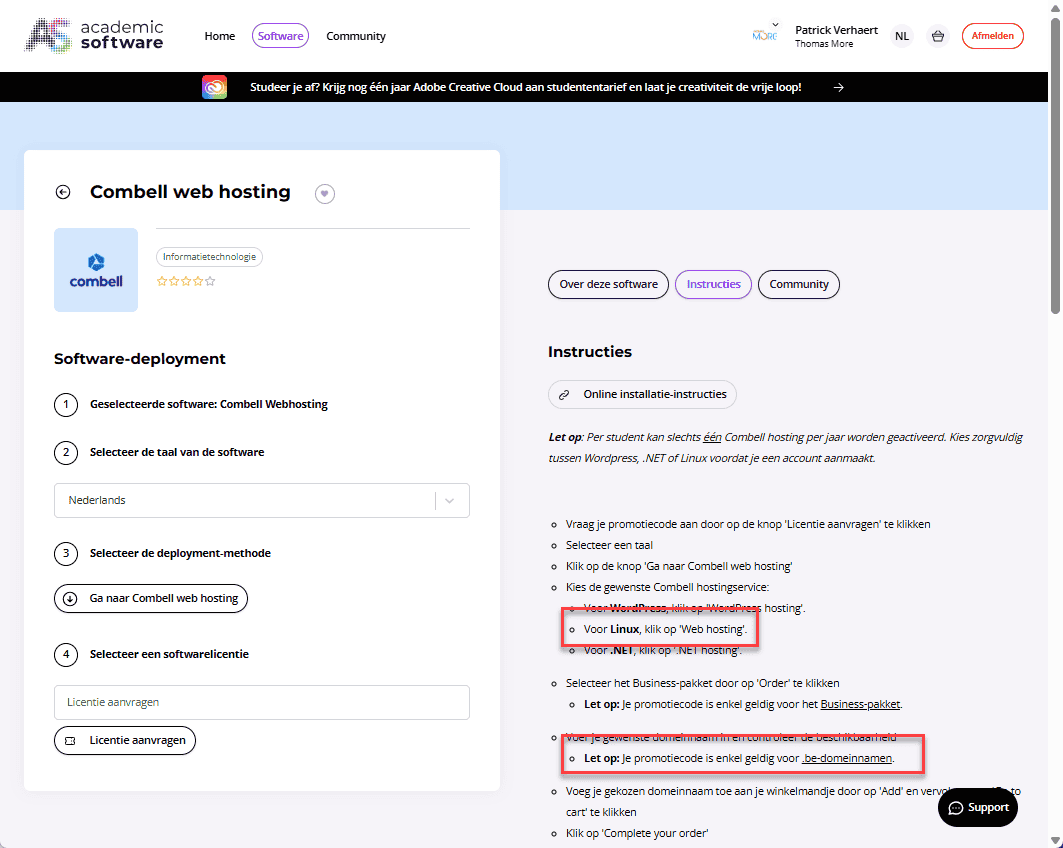
As a student of Thomas More, you can claim free web hosting and a free .be domain name at combell.com.
- Log in at https://www.academicsoftware.eu/ and search for Combell Web hosting ( Linux).
- Follow the instructions to request a License, selecting the Linux web hosting option.
- IMPORTANT: The free offer only includes
.bedomain names.
Preparing the Server Environment
Before uploading any files, we must configure the remote server to match our application's requirements. This involves setting the correct PHP version, creating a subdomain, and securing it with an SSL certificate.
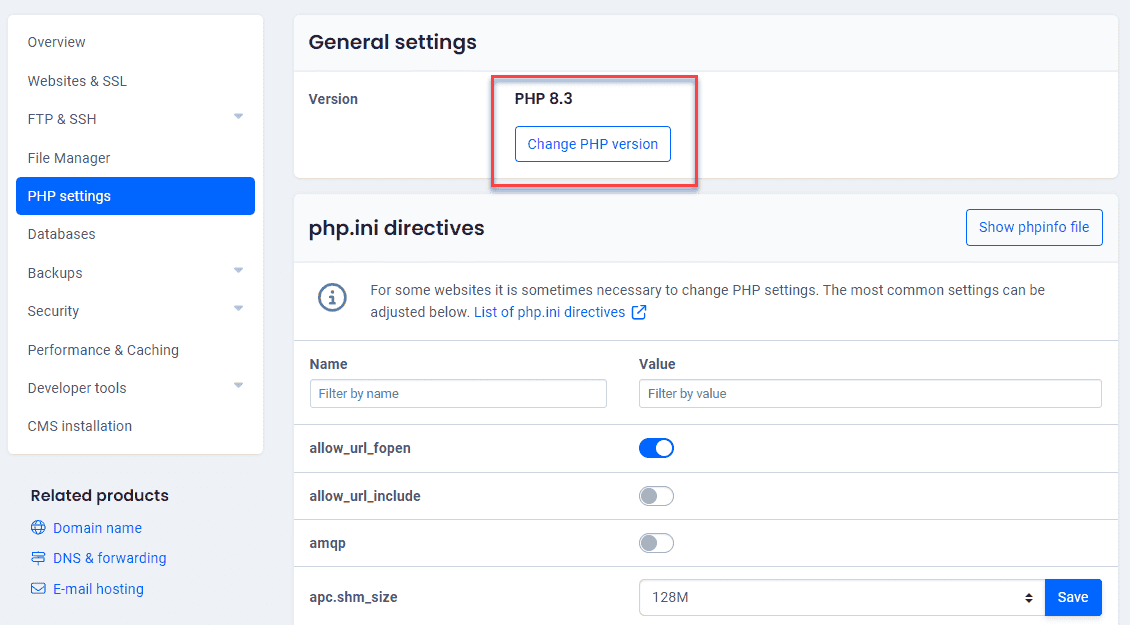
Update PHP Settings
Ensuring the PHP version on the server matches your local development environment is crucial for avoiding compatibility issues.
- Log in to your Combell dashboard: https://my.combell.com/
- Navigate to My Products > Web hosting and click Manage hosting for your domain.
- In the left sidebar, go to PHP settings.
- General settings: Select the PHP version used during development (PHP 8.3).
- php.ini directives: The default settings are generally sufficient for a standard Laravel application.
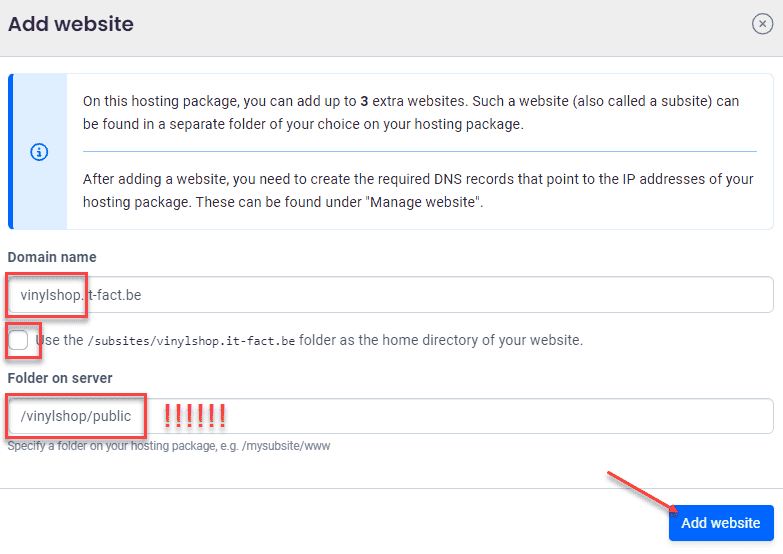
Add and Configure a Subdomain
We will deploy our application to a dedicated subdomain (e.g., vinylshop.yourdomain.be) to keep it separate from the main domain. The most critical part of this step is setting the correct document root. For security and proper functioning, a Laravel application's document root must always point to its public directory.
- In the Combell sidebar, navigate to Websites & SSL.
- Click Add website.
- Domain name: Enter the full subdomain you want to use (e.g.,
vinylshop.yourdomain.be). - Home directory: This must be configured to point to the
publicfolder inside your future project directory.- Uncheck the default folder option.
- Set the Folder on the server to
/vinylshop/public. We will upload our project into the/vinylshopdirectory later.
- Domain name: Enter the full subdomain you want to use (e.g.,
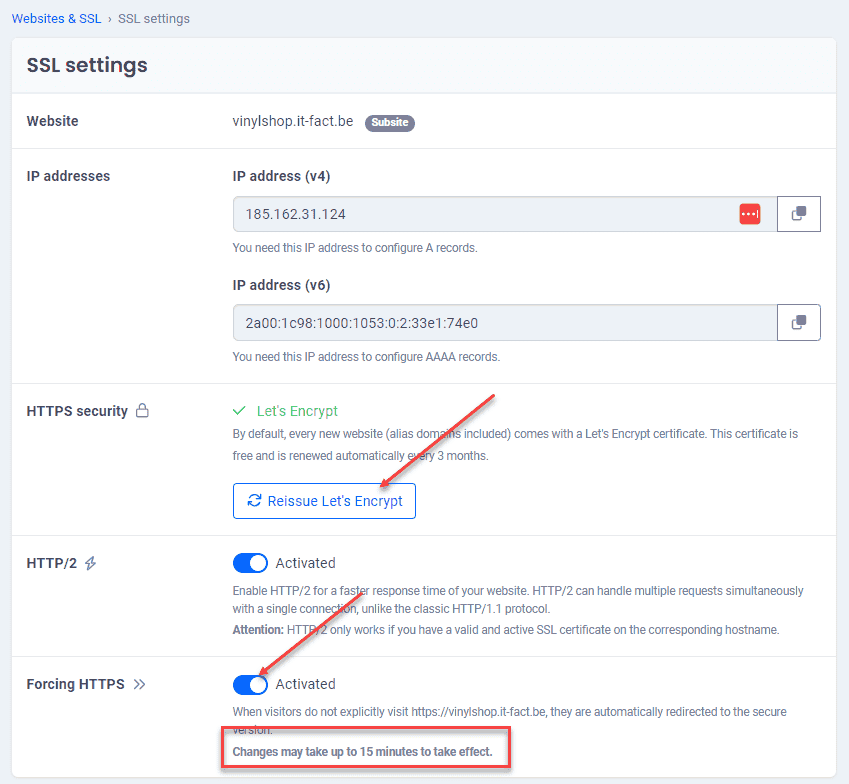
Secure Your Subdomain with SSL
- After the subdomain is created, find it in the list and go to its SSL settings.
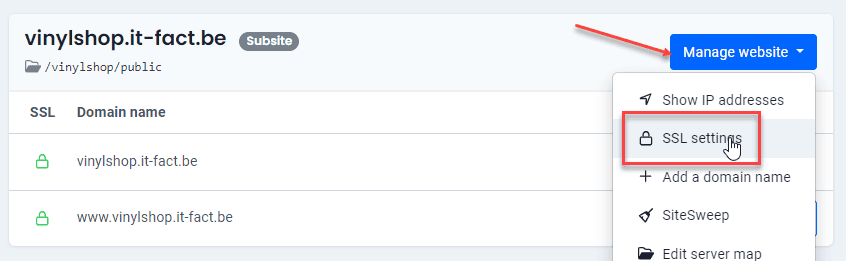
- Click the button to Enable Let's Encrypt to get a free SSL certificate.
- Once enabled, activate Force HTTPS to ensure all traffic to your site is encrypted and secure.
Deploying Your Application
With the server prepared, we can now compile our assets, configure our deployment tool, and upload the project files.
Compile Assets for Production
During development, Vite uses a local server to provide assets on-the-fly with Hot Module Replacement. For a production environment, all CSS and JavaScript assets must be compiled into optimized, static files.
- In your local project terminal, run the Vite build command:bash
npm run build - This command creates a
public/builddirectory containing minified and versioned CSS and JavaScript files. The@viteBlade directive will automatically point to these production assets instead of the development server. - For more details, refer to Config -> Laravel Vite -> Compile for Production.
The @vite directive links to the compiled, versioned asset files in the build directory.
html
<head>
    <meta charset="UTF-8">
    ...
    <link rel="stylesheet" href="https://vinylshop.it-fact.be/build/assets/app.9d96761f.css" />
    <script type="module" src="https://vinylshop.it-fact.be/build/assets/app.ab93cf8a.js"></script>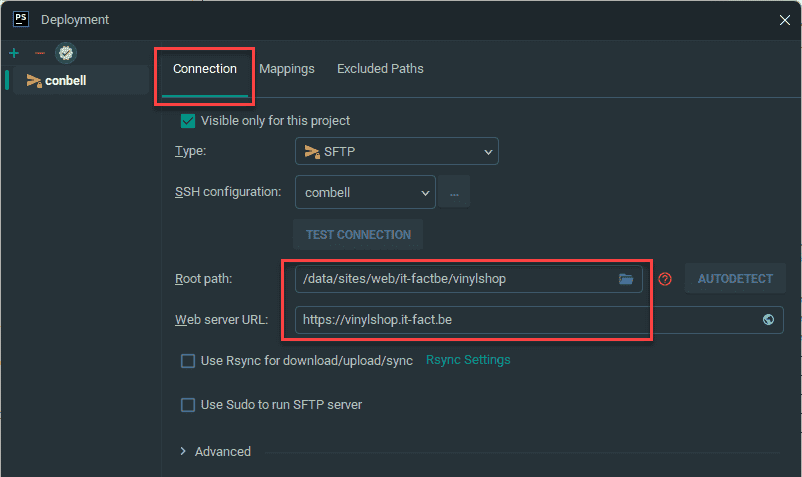
</head>Configure PhpStorm for SFTP Deployment
We will use the Secure File Transfer Protocol (SFTP) to upload our files. PhpStorm's integrated deployment tools streamline this process.
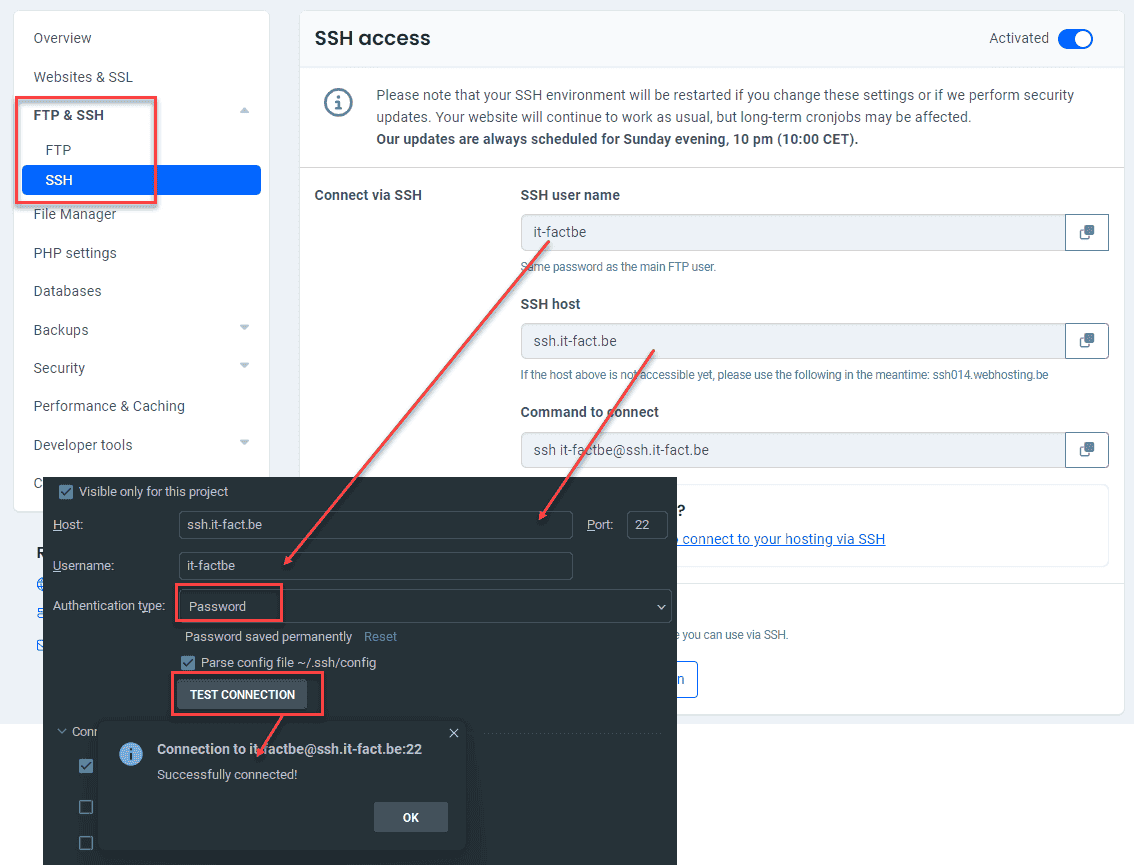
- First, locate your SSH credentials in the Combell dashboard under SSH access.
- In PhpStorm, open the deployment configuration via Tools -> Deployment -> Configuration....
- Click the + icon, select SFTP, and give the configuration a name (e.g., "combell").
- In the Connection tab, click the ... button next to SSH configuration to add your credentials.
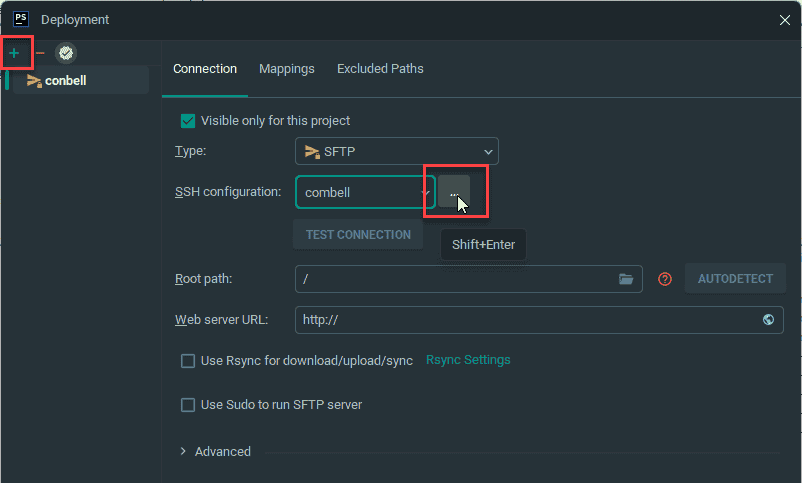
- Enter the host, username, and password provided by Combell and use the Test Connection button to verify them.
- Return to the Connection tab and finalize the settings:
- Root path: Set this to the server directory where your project will reside (e.g.,
data/sites/web/<domain>/vinylshop). - Web server URL: Enter the full HTTPS URL of your subdomain (e.g.,
https://vinylshop.yourdomain.be).
- Root path: Set this to the server directory where your project will reside (e.g.,
- Switch to the Mappings tab to link your local project to the remote directory:
- Local path: This should be the root of your local Laravel project.
- Deployment path and Web path: Set both to
/. This maps the local project root directly to the remoteRoot path(/vinylshop) you configured earlier.

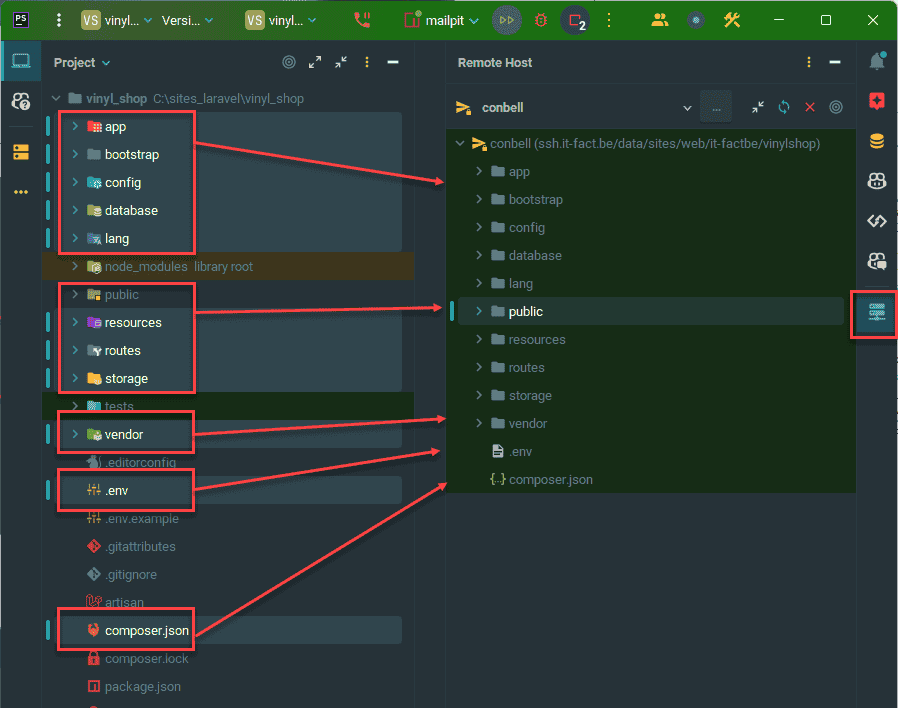
Upload the Project Files
- In PhpStorm, open the Remote Host tool window (View -> Tool Windows -> Remote Host).
- Select all files and folders in your local project except for
node_modulesandtests. These are development-specific and are not needed on the production server. - Right-click the selection and choose Deployment -> Upload to Combell.
- Ensure that essential root files like
.envandcomposer.jsonare included in the upload.
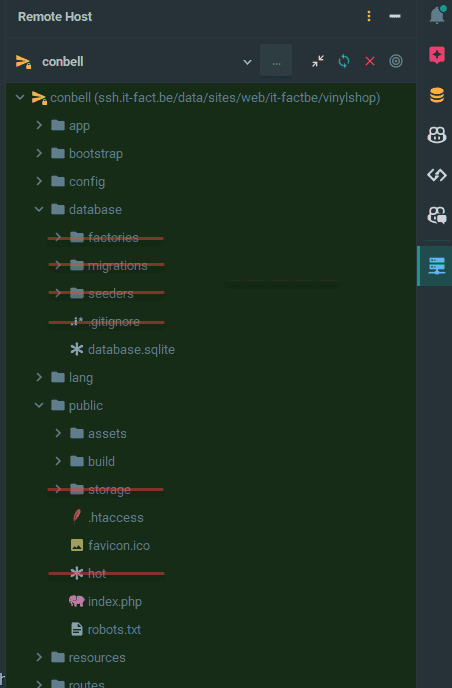
Post-Upload Cleanup
After the upload is complete, a few items on the server need to be cleaned up.
- Using the remote file browser in PhpStorm, navigate to the remote
databasefolder and delete all files except yourdatabase.sqlitefile. - Navigate to the remote
publicfolder and delete thehotfile (if it exists) and thestoragedirectory. Thepublic/storagepath must be a symbolic link, not a physical directory.
Create the Storage Symlink
To make your uploaded images (like record covers) publicly accessible, Laravel requires a symbolic link from public/storage to storage/app/public. Since we cannot run php artisan commands directly on Combell's shared hosting, we can create a temporary route to execute the command.
- Open your local
routes/web.phpfile and add the following route:phpRoute::get('/symlink', function () { Artisan::call('storage:link'); }); - Upload the modified
web.phpfile to the server. - In your browser, visit
https://vinylshop.yourdomain.be/symlink. The page will be blank, but the command will execute on the server, creating the symlink. - Crucially: Remove this route from your local
web.phpfile and upload it again to secure your application.
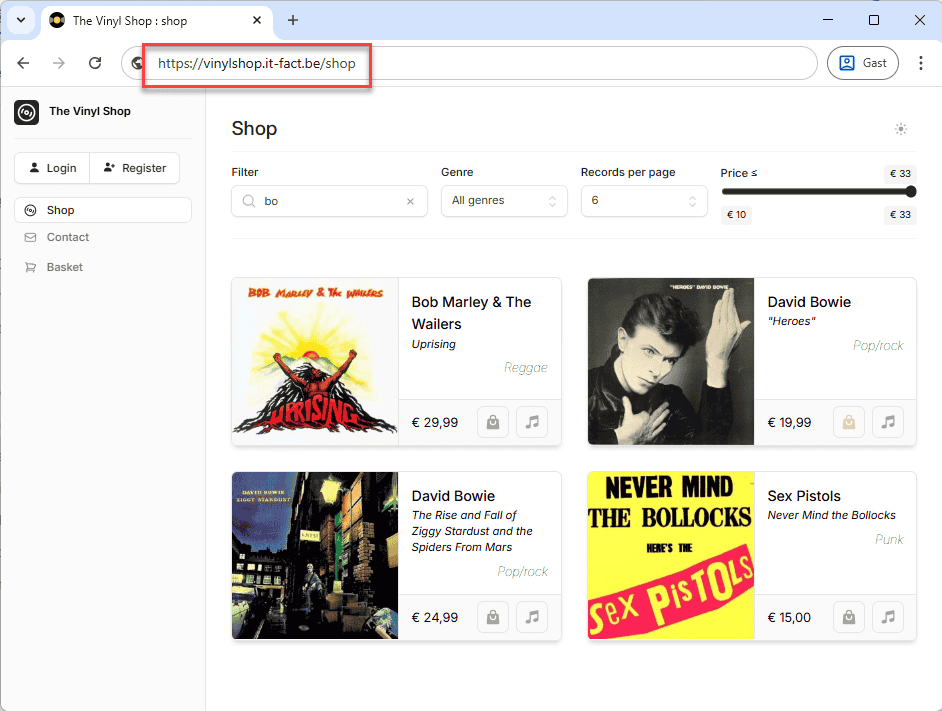
Your site should now be live. Test it by visiting a page that uses the database and storage, such as the main shop page.
Production Environment Configuration
The .env file controls your application's configuration. The version you uploaded was for your local environment; it must now be updated for production. Double-click the remote .env file in PhpStorm to edit it directly on the server.
Set Environment to Production
Set APP_ENV to production and disable debug mode. This is a critical security step that prevents sensitive error details from being shown to visitors.
bash
APP_NAME="The Vinyl Shop"
APP_ENV=production                                  # change from local to production
APP_KEY=base64:e77jPGGcqZ4sNADHI5f/icC+LFnBw34hpRJKSf2ftnI=
APP_DEBUG=false                                     # change from true to false
APP_URL=https://vinylshop.yourdomain.be # set the URL to your domainTIP
If you encounter a "500 | Server Error" on your live site, you can temporarily set APP_DEBUG=true to view the detailed error message for troubleshooting. Always remember to set it back to false.
Configure a Production Mail Server
To send emails for password resets, contact forms, or order confirmations, your application must connect to a real SMTP server.
- In your Combell dashboard, go to your email settings and create a new mailbox (e.g.,
admin@yourdomain.be).

- Use the credentials for this new mailbox to update the
MAIL_*variables in your remote.envfile.
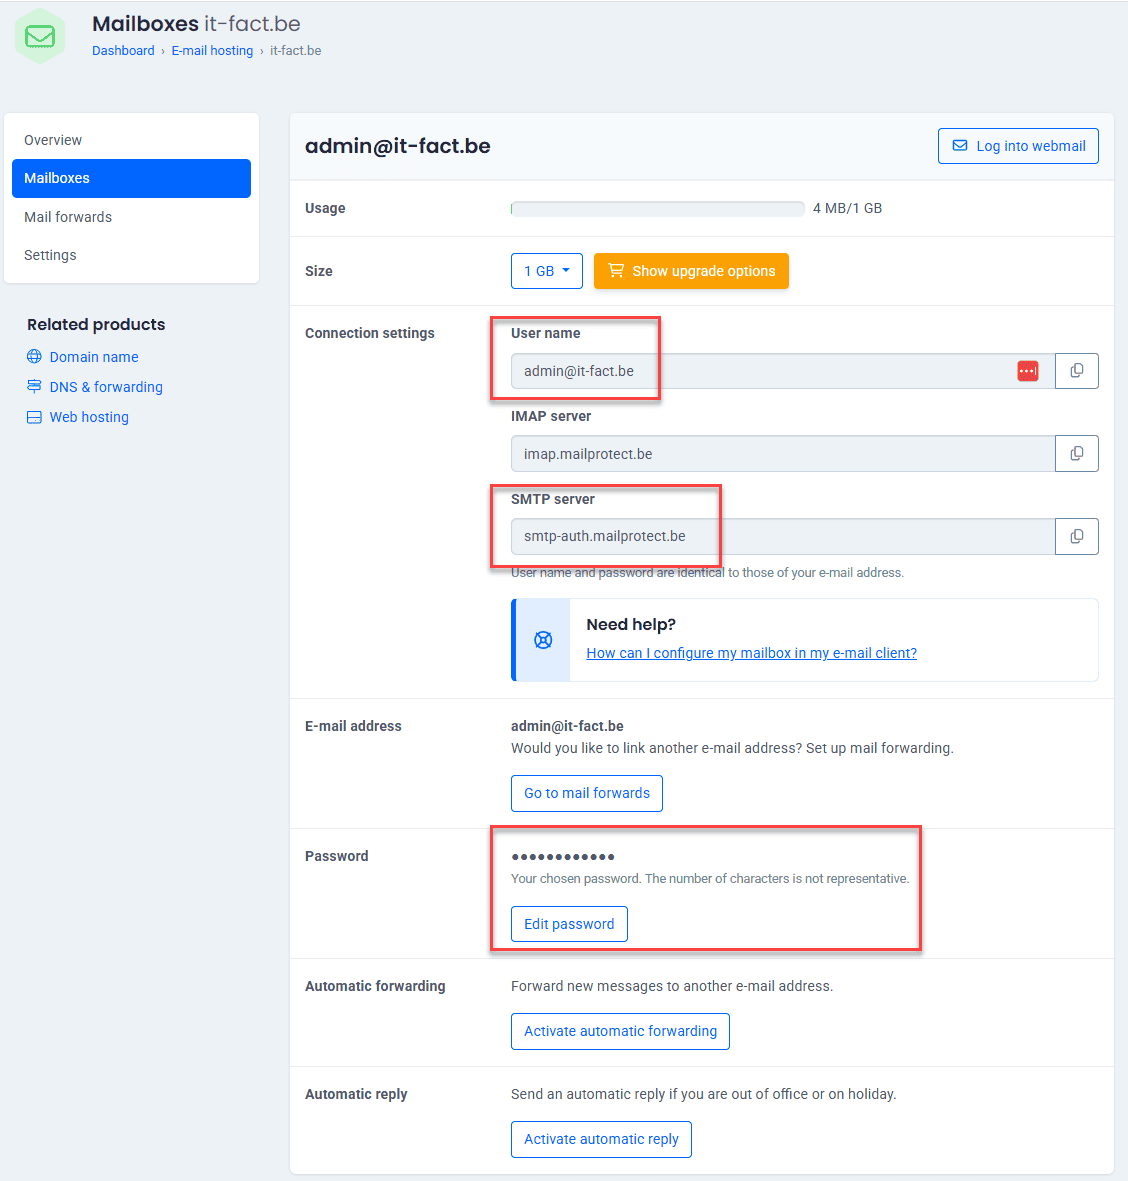
bash
MAIL_MAILER=smtp
MAIL_SCHEME=null
MAIL_HOST=smtp-auth.mailprotect.be        # change from 127.0.0.1 to smtp-auth.mailprotect.be
MAIL_PORT=465                             # change form 1025 to 465
MAIL_USERNAME=admin@yourdomain.be         # your email address
MAIL_PASSWORD=xxxxx                       # your email password
MAIL_FROM_ADDRESS=admin@yourdomain.be     # your email address
MAIL_FROM_NAME="${APP_NAME}"- Save the remote
.envfile by clicking the Upload to Default Server button in the notification bar at the top of the editor.

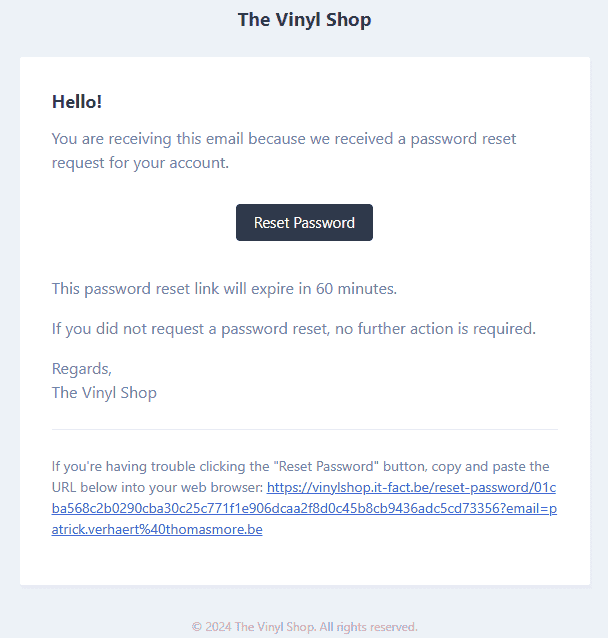
WARNING
Ensure you have a user in your remote database with a real, working email address. Test your mail configuration by requesting a password reset for this user. You should receive the email successfully.
Site Maintenance and Updates
Deploying is an ongoing process. Follow these guidelines when updating your live application.
- If you delete a file locally, remember to delete it on the remote server as well.
- For backend-only changes (e.g., in Livewire components, routes), you can upload the individual files.
- When you update Composer packages locally (
composer update), the most reliable method is to delete the entirevendorfolder on the server and re-upload your new localvendorfolder.
IMPORTANT: Updating Frontend Assets or Views
When you modify any frontend assets (resources/js, resources/css) or Blade views (resources/views), you must follow this precise workflow to avoid issues with browser caching and stale files:
- Stop your local Vite development server (
composer run dev). - Rebuild your assets for production:
npm run build. - On the remote server, delete the entire
public/buildfolder. - Upload the new
public/buildfolder from your local machine. - Upload any changed Blade view files from
resources/views. - Crucially, if the
public/hotfile exists on the remote server, delete it. - You may now restart your local development server (
composer run dev).
The hot File Explained
The public/hot file is created by Vite during development (composer run dev). It contains the URL of the local dev server. The @vite directive reads this file and injects scripts to enable Hot Module Replacement. When you run npm run build, this file is deleted, causing @vite to fall back to the compiled assets in public/build.
WARNING
You must always delete the public/hot file from the production server. If it is present, your live site will try to load assets from your local machine, which will fail and break all styling and functionality.
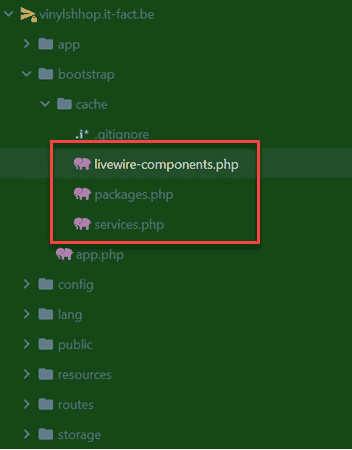
Troubleshooting Cache Issues
Laravel uses various caches to improve performance. After an update, these caches can sometimes become stale, causing unexpected behavior.
- To resolve this, you must clear the application cache on the remote server.
- Using your SFTP client (like PhpStorm's Remote Host), navigate to the
bootstrap/cachedirectory. - Delete all the files inside this folder. Do not delete the
cachefolder itself.