Appearance
Database Migrations and Seeders
Now that we have a grasp of the basic project structure, we'll focus on setting up the database for our Vinyl Shop application. This involves defining the structure of our database tables using migrations and populating them with initial data using seeders.
FOREWARNING
Some steps outlined in this chapter, particularly the initial database migration, already have been performed when you first created the vinyl_shop project using the Livewire Starter Kit. We are revisiting them here comprehensively as they form a crucial part of understanding database management in Laravel.
For the Vinyl Shop application, we require five core database tables: users, genres (for music genres), records, orders, and orderlines. Below is a simplified representation of our database schema, omitting some tables and columns for clarity. Tables like personal_access_tokens, password_reset_tokens, migrations, and others are managed internally by Laravel and its packages (like the Livewire Starter Kit for authentication) and won't be our primary focus in this course.
Locating the Database
By default, Laravel 11 and later versions utilize a SQLite database. You'll find this database as a single file named database.sqlite located within the database directory of your project root.
The connection settings for the database are defined in the .env file at the root of your project. The default configuration looks like this:
php
DB_CONNECTION=sqlite
# DB_HOST=127.0.0.1
# DB_PORT=3306
# DB_DATABASE=laravel
# DB_USERNAME=root
# DB_PASSWORD=
1
2
3
4
5
6
2
3
4
5
6
Notice that only DB_CONNECTION is active and set to sqlite. The other lines are commented out (#) and would typically be used if connecting to a different database system, such as MySQL or PostgreSQL.
IMPORTANT
It's generally recommended to stick with the default database filename database.sqlite. Changing it requires modifications to Laravel's database configuration, which adds unnecessary complexity at this stage.
Creating Models, Migrations, and Seeders
Laravel manages the evolution of your database schema through migrations. Think of migrations as version control for your database. They allow you to define your table structures in PHP code and apply these changes incrementally.
Advantages of Migrations:
- Team Collaboration: When working in a team, migrations ensure every developer has the same database structure without manual SQL commands.
- Consistency: Easily apply schema changes across different environments (local development, testing, production).
- Rollbacks: If a change introduces problems, migrations can often be rolled back.
All migration files reside in the database/migrations directory. By default, a fresh Laravel application (especially with the Livewire Starter Kit) includes several migrations:
0001_01_01_000000_create_users_table.php: Creates tables related to users, password resets, and sessions.0001_01_01_000001_create_cache_table.php: Creates tables for Laravel's caching system.0001_01_01_000002_create_jobs_table.php: Creates tables for managing queued jobs (not used in this course).2025_09_22_145432_add_two_factor_columns_to_users_table.php: Add 2FA to the users table.
NAMING CONVENTIONS: MIGRATIONS & TABLES
- Migration Filenames: Start with a timestamp (YYYY_MM_DD_HHMMSS) followed by a descriptive name in
snake_case( e.g.,2024_10_01_120000_create_genres_table.php). - The default Laravel migrations use
0001_01_01_.... - Database Table Names: Laravel conventions favor
snake_caseand plural names (e.g., the migrationcreate_genres_tablecreates a table namedgenres).
While you can create a migration file using php artisan make:migration create_genres_table, a more efficient approach is to create the corresponding Eloquent Model alongside its migration. Eloquent is Laravel's Object-Relational Mapper (ORM), which makes interacting with your database tables intuitive. Each database table typically has a corresponding Model class in the app/Models directory used to query, insert, update, and delete records.
You can generate a Model and its migration simultaneously using php artisan make:model ModelName -m. If you also anticipate needing initial data for the table, you can generate a Model, migration, and a seeder using php artisan make:model ModelName -ms. Using these commands helps adhere to Laravel's naming conventions.
Let's create the necessary Models, migrations, and seeders for our Vinyl Shop. The User model already exists by default. We only need seeders for Genre and Record.
Execute the following commands in your terminal:
bashphp artisan make:model Genre -ms php artisan make:model Record -ms php artisan make:model Order -m php artisan make:model Orderline -m1
2
3
4
NAMING CONVENTIONS: MODELS
- Model Class Names: Always singular,
PascalCase(e.g.,Genre,Record,Orderline). - Corresponding Table Names: Laravel assumes the table name is the
snake_case, plural version of the model name ( e.g.,Genremodel maps togenrestable).
For the rest of this section, we'll focus on defining the table structures within the generated migration files. We'll cover the Models themselves in the next chapter.
Modifying the Migration Files
Each generated migration file contains a class with (primarily) two methods: up() and down().
up(): Contains the code to apply the migration (e.g., create a table, add a column).down(): Contains the code to reverse the migration (e.g., drop a table, remove a column). This allows you to roll back changes if needed.
We will primarily modify the up() method in our newly created migration files to define the columns for each table. Laravel's Schema Builder provides a fluent API for defining table structures. You can find a list of available column types in the Laravel documentation.
NAMING CONVENTIONS: COLUMNS & KEYS
- Column Names: Use
snake_case(e.g.,total_price,email_verified_at). - Primary Key: Conventionally named
id. - Foreign Keys: Use the singular model name followed by
_id(e.g.,user_idrefers to theidon theuserstable,genre_idrefers to theidon thegenrestable). Avoid using the plural table name likeusers_id.
Let's define the columns for each table.
Users Table
- Open the existing migration file:
database/migrations/0001_01_01_000000_create_users_table.php.
This file uses the Schema::create() method. The first argument is the table name (users), and the second is a Closure function that receives a Blueprint object. You use methods on the Blueprint object ($table) to define the table's columns.
Laravel's default users migration already includes several helpful columns:
$table->id();: Creates an auto-incrementing, unsigned BIGINT primary key column namedid.$table->string('name');: A string column for the user's name.$table->string('email')->unique();: A string column for the email, which must be unique across the table.$table->timestamp('email_verified_at')->nullable();: A timestamp column to record when the user verified their email address (can be null).$table->string('password');: A string column to store the hashed password.$table->rememberToken();: Adds a column used for "remember me" functionality.$table->timestamps();: Adds two nullable TIMESTAMP columns,created_atandupdated_at, automatically managed by Eloquent to track record creation and updates.
We need to add two boolean columns: active (defaulting to true) and admin (defaulting to false). We also need to ensure case-insensitive comparisons for name and email when using SQLite.
- Modify the
up()method as follows:
php
use Illuminate\Database\Migrations\Migration;
use Illuminate\Database\Schema\Blueprint;
use Illuminate\Support\Facades\Schema;

return new class extends Migration {
    /**
     * Run the migrations.
     */
    public function up(): void
    {
        Schema::create('users', function (Blueprint $table) {
            $table->id();
            $table->string('name')->collation('nocase');            // Make name case-insensitive for SQLite
            $table->string('email')->collation('nocase')->unique(); // Make email case-insensitive for SQLite and unique
            $table->boolean('active')->default(true);               // Add active column, default true
            $table->boolean('admin')->default(false);               // Add admin column, default false
            $table->timestamp('email_verified_at')->nullable();
            $table->string('password');
            $table->rememberToken();
            $table->timestamps();
        });

        // ... (Schema::create for password_reset_tokens and sessions remains unchanged) ...
    }

    /**
     * Reverse the migrations.
     */
    public function down(): void
    {
        Schema::dropIfExists('users');
        Schema::dropIfExists('password_reset_tokens');
        Schema::dropIfExists('sessions');
    }
};
1
2
3
4
5
6
7
8
9
10
11
12
13
14
15
16
17
18
19
20
21
22
23
24
25
26
27
28
29
30
31
32
33
34
35
2
3
4
5
6
7
8
9
10
11
12
13
14
15
16
17
18
19
20
21
22
23
24
25
26
27
28
29
30
31
32
33
34
35
collation('nocase')
Adding ->collation('nocase') is important when using SQLite if you want string comparisons (like lookups or unique constraints) to be case-insensitive. By default, SQLite's BINARY collation treats 'A' and 'a' as different. nocase treats them as the same. This is often desirable for usernames and email addresses.
Genres Table
- Open the newly created migration file (e.g.,
database/migrations/yyyy_mm_dd_hhmmss_create_genres_table.php). - Define the columns in the
up()method:
php
<?php

use Illuminate\Database\Migrations\Migration;
use Illuminate\Database\Schema\Blueprint;
use Illuminate\Support\Facades\Schema;

return new class extends Migration
{
    /**
     * Run the migrations.
     */
    public function up(): void
    {
        Schema::create('genres', function (Blueprint $table) {
            $table->id();
            $table->string('name')->collation('nocase')->unique(); // Genre name, case-insensitive and unique
            $table->timestamps();
        });
    }

    /**
     * Reverse the migrations.
     */
    public function down(): void
    {
        Schema::dropIfExists('genres');
    }
};
1
2
3
4
5
6
7
8
9
10
11
12
13
14
15
16
17
18
19
20
21
22
23
24
25
26
27
28
2
3
4
5
6
7
8
9
10
11
12
13
14
15
16
17
18
19
20
21
22
23
24
25
26
27
28
Records Table
- Open the newly created migration file (e.g.,
database/migrations/yyyy_mm_dd_hhmmss_create_records_table.php). - Define the columns and the foreign key relationship to the
genrestable in theup()method.
We'll link records to genres using a foreign key. $table->foreignId('genre_id') creates the column. ->constrained() tells Laravel to add a foreign key constraint, automatically assuming it references the id column on the genres table (derived from genre_id). ->onDelete('cascade') and ->onUpdate('cascade') ensure that if a genre is deleted or its ID updated, related records are also deleted or updated accordingly (maintaining referential integrity).
We also add columns for artist, title, price, stock, and a unique mb_id (MusicBrainz ID) which we'll use later to fetch extra data.
php
<?php

use Illuminate\Database\Migrations\Migration;
use Illuminate\Database\Schema\Blueprint;
use Illuminate\Support\Facades\Schema;

return new class extends Migration
{
    /**
     * Run the migrations.
     */
    public function up(): void
    {
        Schema::create('records', function (Blueprint $table) {
            $table->id();
            $table->foreignId('genre_id')                       // Foreign key relationship to genres table
                  ->constrained()                               // Assumes genres.id
                  ->onDelete('cascade')                         // If genre deleted, delete record
                  ->onUpdate('cascade');                        // If genre id updated, update here
            $table->string('artist')->collation('nocase');      // Artist name, case-insensitive
            $table->string('title')->collation('nocase');       // Record title, case-insensitive
            $table->string('mb_id', 36)->nullable()->unique();  // MusicBrainz ID (nullable, unique, 36 chars)
            $table->float('price', 5, 2)->default(19.99);       // Price, default 19.99
            $table->unsignedInteger('stock')->default(1);       // Stock level, default 1
            $table->timestamps();
        });
    }

    /**
     * Reverse the migrations.
     */
    public function down(): void
    {
        Schema::dropIfExists('records');
    }
};
1
2
3
4
5
6
7
8
9
10
11
12
13
14
15
16
17
18
19
20
21
22
23
24
25
26
27
28
29
30
31
32
33
34
35
36
2
3
4
5
6
7
8
9
10
11
12
13
14
15
16
17
18
19
20
21
22
23
24
25
26
27
28
29
30
31
32
33
34
35
36
Orders Table
- Open the newly created migration file (e.g.,
database/migrations/yyyy_mm_dd_hhmmss_create_orders_table.php). - Define the columns and the foreign key relationship to the
userstable in theup()method.
php
<?php

use Illuminate\Database\Migrations\Migration;
use Illuminate\Database\Schema\Blueprint;
use Illuminate\Support\Facades\Schema;

return new class extends Migration
{
    /**
     * Run the migrations.
     */
    public function up(): void
    {
        Schema::create('orders', function (Blueprint $table) {
            $table->id();
            $table->foreignId('user_id')                    // Foreign key relationship to users table
                  ->constrained()                           // Assumes users.id
                  ->onDelete('cascade')                     // If user deleted, delete order
                  ->onUpdate('cascade');                    // If user id updated, update here
            $table->float('total_price', 6, 2);             // Total order price (e.g., 120.99)
            $table->timestamps();
        });
    }

    /**
     * Reverse the migrations.
     */
    public function down(): void
    {
        Schema::dropIfExists('orders');
    }
};
1
2
3
4
5
6
7
8
9
10
11
12
13
14
15
16
17
18
19
20
21
22
23
24
25
26
27
28
29
30
31
32
2
3
4
5
6
7
8
9
10
11
12
13
14
15
16
17
18
19
20
21
22
23
24
25
26
27
28
29
30
31
32
Orderlines Table
- Open the newly created migration file (e.g.,
database/migrations/yyyy_mm_dd_hhmmss_create_orderlines_table.php). - Define the columns and the foreign key relationship to the
orderstable in theup()method.
Each order line represents a specific record purchased within an order.
php
<?php

use Illuminate\Database\Migrations\Migration;
use Illuminate\Database\Schema\Blueprint;
use Illuminate\Support\Facades\Schema;

return new class extends Migration
{
    /**
     * Run the migrations.
     */
    public function up(): void
    {
        Schema::create('orderlines', function (Blueprint $table) {
            $table->id();
            $table->foreignId('order_id')                   // Foreign key relationship to orders table
                  ->constrained()                           // Assumes orders.id
                  ->onDelete('cascade')                     // If order deleted, delete line item
                  ->onUpdate('cascade');                    // If order id updated, update here
            $table->string('artist')->collation('nocase');  // Copied from record at time of order
            $table->string('title')->collation('nocase');   // Copied from record at time of order
            $table->string('mb_id', 36)->nullable();        // Copied from record (nullable if original was null)
            $table->unsignedInteger('quantity');            // How many of this record were ordered
            $table->float('total_price', 6, 2);             // Price for this line (quantity * price_at_time_of_order)
            $table->timestamps();
        });
    }

    /**
     * Reverse the migrations.
     */
    public function down(): void
    {
        Schema::dropIfExists('orderlines');
    }
};
1
2
3
4
5
6
7
8
9
10
11
12
13
14
15
16
17
18
19
20
21
22
23
24
25
26
27
28
29
30
31
32
33
34
35
36
2
3
4
5
6
7
8
9
10
11
12
13
14
15
16
17
18
19
20
21
22
23
24
25
26
27
28
29
30
31
32
33
34
35
36
FOREIGN KEY CONSTRAINTS CLARIFIED
Using $table->foreignId('some_model_id')->constrained() is shorthand. By convention:
- It assumes the foreign key column (
some_model_id) references theidcolumn. - It assumes the referenced table name is the plural,
snake_caseversion of the prefix before_id(sosome_model_idreferences thesome_modelstable).
If your referenced table name doesn't follow this convention, you must specify it: $table->foreignId('verkoper_id')->constrained('users');
Running the Migrations
With our migration files defined, we need to execute them to actually create the tables in our database.sqlite file.
Since we likely ran initial migrations when setting up the project, and we've made changes (like adding columns to the users table), the cleanest way to apply our current set of migrations is to drop all existing tables and recreate the database schema from scratch.
- Run the following command in your terminal:
bash
php artisan migrate:fresh1
This command will drop all tables and then run the up() method of every migration file in chronological order, resulting in a database that precisely matches your migration definitions.
migrate vs migrate:fresh
php artisan migrate: Runs only the migrations that haven't been run yet. Laravel keeps track of executed migrations in a specialmigrationstable within your database.php artisan migrate:fresh: Drops all tables in the database first, then runs all migrations from the beginning. This is useful during development when you're actively changing table structures and want a clean slate, or if you've modified existing migration files.
Connecting via PhpStorm (Optional but Recommended)
Connecting your IDE directly to the database can significantly speed up development. PhpStorm has excellent database tools that allow you to view table structures, browse data, and even make quick edits without external software.
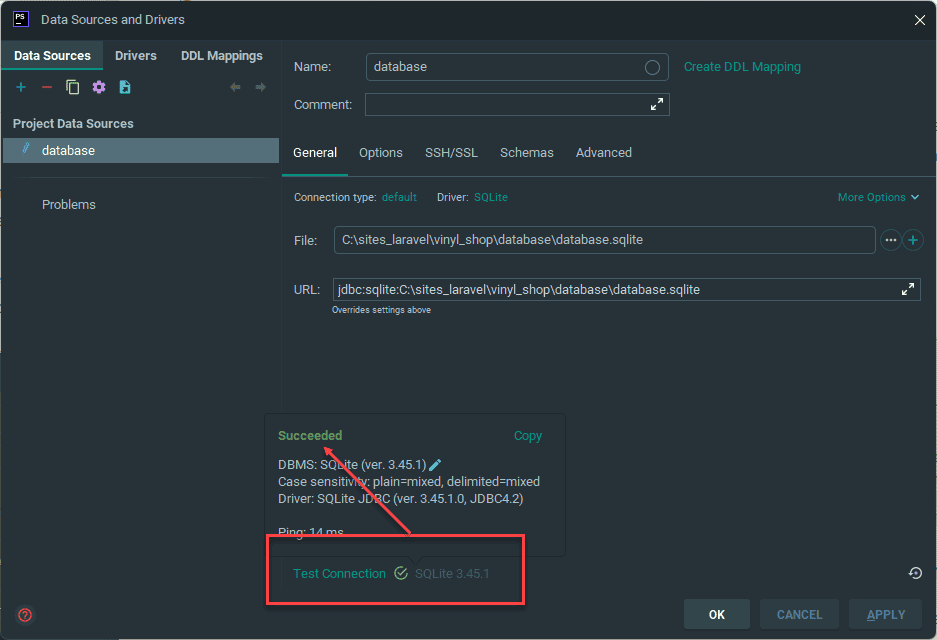
To connect PhpStorm to your database.sqlite file:
- Locate the
database/database.sqlitefile in the PhpStorm Project view. - Double-click the file. PhpStorm should recognize it and open the Data Source properties dialogue.
- Verify the settings (they should be auto-filled correctly for SQLite).
- Click the Test Connection link. The first time, PhpStorm may prompt you to download the necessary SQLite driver. Allow it to download.
- If the connection test is successful, click OK.

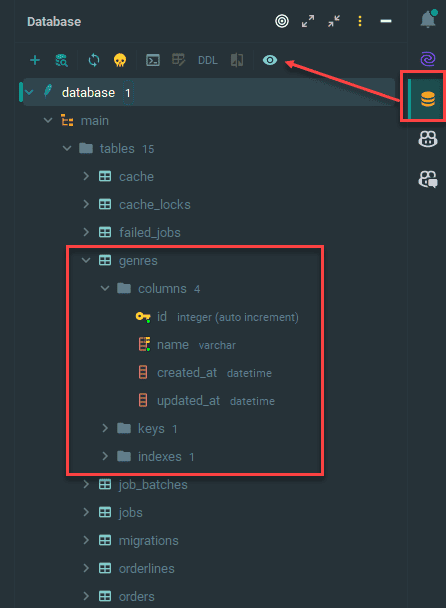
You can now access the database through the Database tool window (usually found on the right-hand side panel). Expand the connection to see your tables (users, genres, records, etc.). Double-clicking a table name will open it in a data editor view. 
Seeding the Database
Migrations create the structure, but Seeders populate the tables with initial or default data. This is incredibly useful for setting up development environments with consistent test data (like pre-defined users, default genres and records, etc.).
All seeder classes are stored in the database/seeders directory. We'll create seeders to insert some default users, genres, and records into our newly created tables.
Creating Seeder Classes
You can generate a new seeder class using the Artisan command php artisan make:seeder NameSeeder. Remember, we already generated GenreSeeder and RecordSeeder when we created their models using the -ms flag. We still need one for the users.
Create the
UserSeeder:bashphp artisan make:seeder UserSeeder1
UserSeeder
- Open
database/seeders/UserSeeder.php. - Inside the
run()method, we'll use theDBfacade'stable()andinsert()methods to add user data. Theinsert()method takes an array of associative arrays, where each associative array represents a row, and its keys correspond to the table's column names. - Remember to hash passwords using the
Hashfacade and usenow()(a Carbon instance) for timestamps. - Import the
DBandHashfacades at the top of the file.
php
<?php
namespace Database\Seeders;
use DB; // Import DB facade
use Hash; // Import Hash facade
use Illuminate\Database\Console\Seeds\WithoutModelEvents;
use Illuminate\Database\Seeder;
class UserSeeder extends Seeder
{
/**
* Run the database seeds.
*/
public function run(): void
{
// Insert specific users
DB::table('users')->insert([
[
'name' => 'John Doe',
'email' => 'john.doe@example.com',
'admin' => true,
'password' => Hash::make('admin1234'), // Use a secure password!
'created_at' => now(),
'email_verified_at' => now()
],
[
'name' => 'Jane Doe',
'email' => 'jane.doe@example.com',
'admin' => false,
'password' => Hash::make('user1234'), // Use a secure password!
'created_at' => now(),
'email_verified_at' => now()
]
]);
1
2
3
4
5
6
7
8
9
10
11
12
13
14
15
16
17
18
19
20
21
22
23
24
25
26
27
28
29
30
31
32
33
34
35
36
37
38
39
40
41
42
43
44
45
46
47
48
49
50
51
52
53
54
55
2
3
4
5
6
7
8
9
10
11
12
13
14
15
16
17
18
19
20
21
22
23
24
25
26
27
28
29
30
31
32
33
34
35
36
37
38
39
40
41
42
43
44
45
46
47
48
49
50
51
52
53
54
55
GenreSeeder
- Open
database/seeders/GenreSeeder.php. - Import the
DBfacade. - Populate the
run()method with genre data. You can copy the full list of genres from the provided Gist: genres and records gist.
php
<?php
namespace Database\Seeders;
use DB; // Import DB facade
use Illuminate\Database\Console\Seeds\WithoutModelEvents;
use Illuminate\Database\Seeder;
class GenreSeeder extends Seeder
{
/**
* Run the database seeds.
*/
public function run(): void
{
// Clear the table first to avoid duplicates if seeder runs multiple times
DB::table('genres')->delete();
1
2
3
4
5
6
7
8
9
10
11
12
13
14
15
16
17
18
19
20
21
22
23
24
25
26
27
28
29
30
31
32
33
34
35
36
37
38
39
40
41
2
3
4
5
6
7
8
9
10
11
12
13
14
15
16
17
18
19
20
21
22
23
24
25
26
27
28
29
30
31
32
33
34
35
36
37
38
39
40
41
RecordSeeder
- Open
database/seeders/RecordSeeder.php. - Import the
DBfacade. - Populate the
run()method with record data. Make sure thegenre_idvalues correspond to the IDs that will be created byGenreSeeder(assumingidstarts at 1 and increments). - IMPORTANT: Copy the full list of records from the Gist: genres and records gist. The code below is only a small sample.
php
<?php
namespace Database\Seeders;
use DB; // Import DB facade
use Illuminate\Database\Console\Seeds\WithoutModelEvents;
use Illuminate\Database\Seeder;
class RecordSeeder extends Seeder
{
/**
* Run the database seeds.
*/
public function run(): void
{
// Clear the table first
DB::table('records')->delete();
1
2
3
4
5
6
7
8
9
10
11
12
13
14
15
16
17
18
19
20
21
22
23
24
25
26
27
28
29
30
31
32
33
34
35
36
37
38
39
40
41
42
43
2
3
4
5
6
7
8
9
10
11
12
13
14
15
16
17
18
19
20
21
22
23
24
25
26
27
28
29
30
31
32
33
34
35
36
37
38
39
40
41
42
43
Calling Seeders from DatabaseSeeder
The database/seeders/DatabaseSeeder.php class acts as the main entry point for running seeders. You call other seeder classes from its run() method using $this->call().
- Open
database/seeders/DatabaseSeeder.php. - Modify the
run()method to call your custom seeders.
ORDER OF SEEDERS
Crucially, because the records table has a foreign key (genre_id) referencing the genres table, you MUST run GenreSeeder before RecordSeeder to ensure the genres exist when the records are inserted.
php
<?php
namespace Database\Seeders;
use App\Models\User; // Default User model import might be present
use Illuminate\Database\Console\Seeds\WithoutModelEvents;
use Illuminate\Database\Seeder;
class DatabaseSeeder extends Seeder
{
/**
* Seed the application's database.
*/
public function run(): void
{
// Call seeders in the correct order
$this->call([
UserSeeder::class,
GenreSeeder::class, // Must run before RecordSeeder
RecordSeeder::class,
]);
1
2
3
4
5
6
7
8
9
10
11
12
13
14
15
16
17
18
19
20
21
22
23
24
25
26
27
28
29
30
2
3
4
5
6
7
8
9
10
11
12
13
14
15
16
17
18
19
20
21
22
23
24
25
26
27
28
29
30
Running the Seeders
Now that the seeders are defined and configured to run in the correct order:
Execute the following command in your terminal:
bashphp artisan db:seed1
This command will execute the run() method of DatabaseSeeder, which in turn will execute the run() methods of UserSeeder, GenreSeeder, and RecordSeeder.
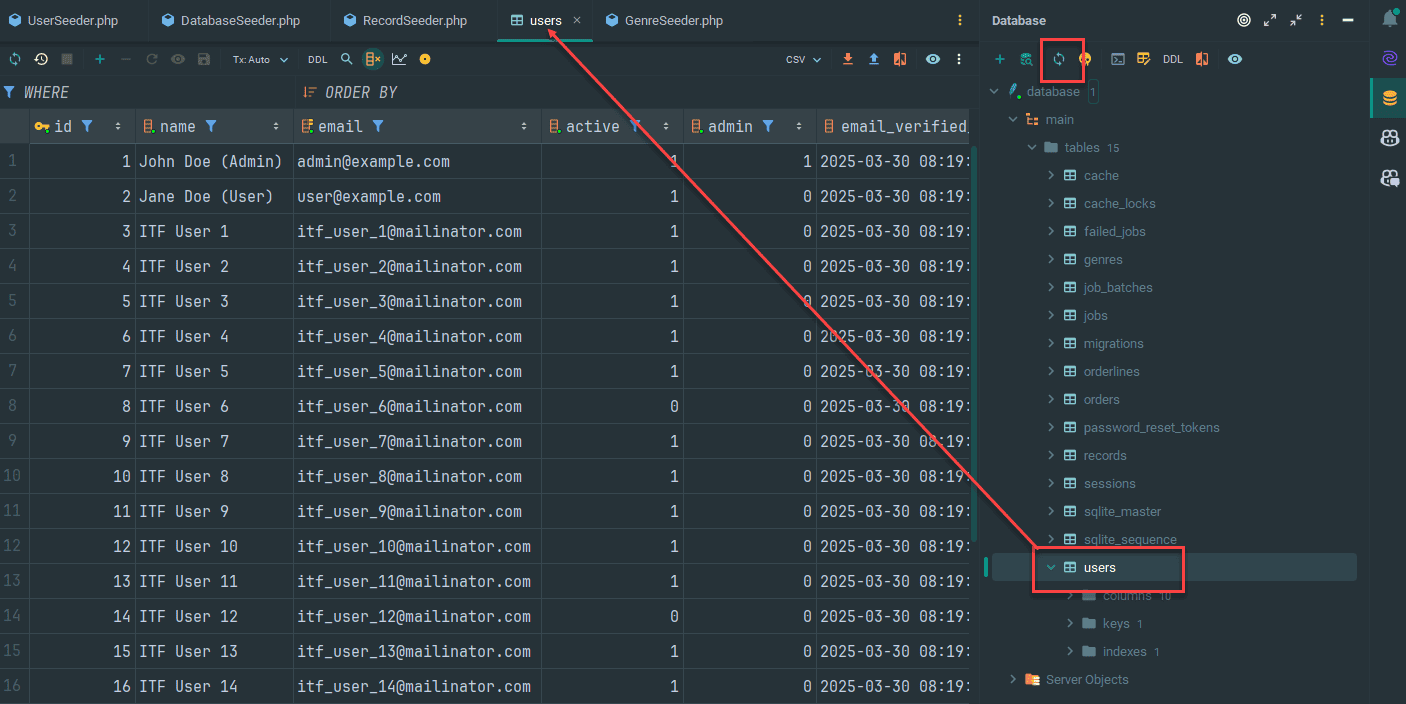
- Refresh your database view in PhpStorm (right-click the connection name and choose 'Refresh' or similar). Double-click the
users,genres, andrecordstables to verify that the data has been inserted successfully.
Refreshing the Database (Migration + Seed)
During development, you'll often need to reset your database to a clean state (reflecting the latest migrations) and repopulate it with seed data. You can do this in one step:
Run the combined command:
bashphp artisan migrate:fresh --seed1
This performs the migrate:fresh action (dropping all tables and running all migrations) immediately followed by the db:seed action (running your DatabaseSeeder). This is a very common command during the development lifecycle.
Autocompletion for Models (Laravel Idea Plugin)
If you are using PhpStorm with the Laravel Idea plugin (highly recommended), it can significantly improve your development experience by providing autocompletion for model attributes (database columns) and relationships.
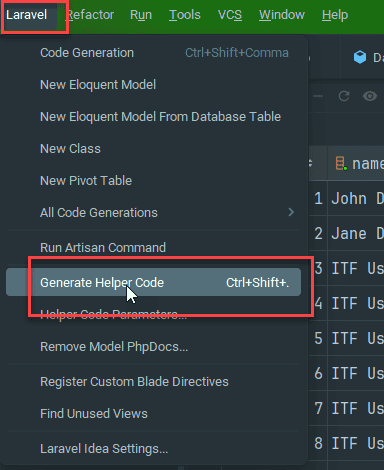
To ensure PhpStorm has the most up-to-date information about your models and their corresponding database columns:
- Go to the PhpStorm menu: Laravel -> Generate Helper Code.
This generates or updates a special helper file (_ide_helper_models.php) that PhpStorm uses for autocompletion.
REMARK
Run Laravel -> Generate Helper Code whenever you:
- Modify table columns in a migration and re-run the migration.
- Add new models or relationships. This keeps PhpStorm's autocompletion accurate.

Backing Up and Restoring Your SQLite Database
While migrations allow you to recreate the structure, they don't preserve the data (except what's in your seeders). For simple backups of your SQLite database including its current data, you can use the sqlite3 command-line tool (if installed).
Backup
- To create a backup (a text file containing SQL commands to recreate the structure and data):
bash
sqlite3 database/database.sqlite .dump > database/vinylshop_backup_YYYY-MM-DD-HHMMSS.sql1
- Replace
YYYY-MM-DD-HHMMSSwith the current date and time or a meaningful name. - Example:
sqlite3 database/database.sqlite .dump > database/vinylshop_backup_2025-10-01-153000.sql - This command reads the
database.sqlitefile, executes the.dumpcommand withinsqlite3to generate SQL statements, and redirects (>) that output into a new.sqlfile in thedatabasedirectory.

Restore
- To restore the database from a backup file:
- First, it's usually best to remove the existing database file to avoid conflicts:
bash
rm database/database.sqlite1
- Then, execute the SQL commands from your backup file to recreate the database:
bash
sqlite3 database/database.sqlite < database/vinylshop_backup_YYYY-MM-DD-HHMMSS.sql1
- Replace
vinylshop_backup_YYYY-MM-DD-HHMMSS.sqlwith the actual name of your backup file. - This command starts
sqlite3, connects to (and creates if it doesn't exist)database.sqlite, and then reads and executes the SQL commands redirected (<) from your backup file.
This backup/restore method is useful for saving specific states of your development database with its data, complementing the structural control provided by migrations and seeders.