Appearance
Eloquent Models: Part 2
In the preceding chapters, we laid the groundwork for using Eloquent models by creating a model class for each database table, implementing mass assignment protection with $fillable or $guarded, and defining the essential hasMany and belongsTo relationships between them.
Now, we'll explore some more advanced and powerful features of Eloquent that help keep your code clean, reusable, and expressive. This chapter introduces:
- Accessors and Mutators: Customizing how attribute data is retrieved from and stored in the database.
- Attribute Visibility: Controlling which model attributes appear in JSON or array representations.
- Appended Attributes: Adding custom, computed attributes to your models' serialized output.
- Query Scopes: Creating reusable query constraints for cleaner controller logic.
To effectively demonstrate these features and see their impact, we will create and utilize our first simple Livewire component. This component will serve as a dynamic view to display the data we query and manipulate using Eloquent.
DO THIS FIRST
Ensure you have followed the setup instructions in the Debugging Livewire Components chapter before proceeding. This will provide helpful debugging tools as we work with our Livewire component.
REMARK
As we modify our models by adding accessors, scopes, etc., remember to regenerate the IDE helper files for accurate autocompletion in PhpStorm.
- Go to the menu Laravel -> Generate Helper Code. Run this command whenever you make significant changes to your model's properties or methods that affect how you might interact with them.
Preparation: Setting Up a Livewire Component
To visualize the results of our Eloquent queries and model manipulations, we need a view. Livewire components are perfect for this, combining backend PHP logic with a reactive Blade view. Let's create a simple Demo component.
Open your terminal in the project root and run the command to create a new Livewire component:
bashphp artisan make:livewire Demo1(or the alias:
php artisan livewire:make Demo)
This command generates two essential files:
app/Livewire/Demo.php: The component's PHP class. This file holds the logic, data (properties), and lifecycle methods, similar to what a traditional controller might handle.resources/views/livewire/demo.blade.php: The component's Blade view template. This file defines the HTML structure and uses Blade syntax to display data from the component class.
Let's examine the initial content of these files.
The newly created component class is quite basic. It extends Livewire's Component base class and contains a single render() method.
The render() method is a fundamental Livewire Lifecycle Hook. It's responsible for rendering the component's Blade view. It executes initially when the component loads and automatically re-runs whenever a public property in the component changes, ensuring the view stays synchronized with the component's state. For now, it simply returns the associated Blade view file.
php
<?php

namespace App\Livewire;

use Livewire\Component;

class Demo extends Component
{
    public function render()
    {
        return view('livewire.demo');   // Returns the corresponding Blade view
    }
}
1
2
3
4
5
6
7
8
9
10
11
12
13
2
3
4
5
6
7
8
9
10
11
12
13
Updating the Route
Next, we need a route to access our new Livewire component in the browser. We'll modify the existing /admin/records route, which previously pointed closure, to now render our Demo component directly.
- Open the
routes/web.phpfile. - Import the
Democomponent class at the top of the file. - Modify the
Route::get('records', ...)definition to point to theDemo::class. Remove or comment out the previous definition for this route.
php
<?php

use Illuminate\Support\Facades\Route;
use App\Livewire\Demo;   // Import the Livewire component

// ... other use statements

Route::prefix('admin')->group(function () {
    Route::redirect('/', '/admin/records');
    Route::get('records', Demo::class)->name('admin.records');
    Route::get('records', function () { ... })->name('admin.records');  // Remove or comment out this lines
    Route::view('download_covers', 'admin.download_covers')->name('admin.covers');
});

// ... other routes
1
2
3
4
5
6
7
8
9
10
11
12
13
14
15
2
3
4
5
6
7
8
9
10
11
12
13
14
15
TIP
To quickly import the Demo class in PhpStorm, place your cursor on Demo in the route definition, press Alt + Enter (or your configured shortcut for quick fixes), and select Import class. Choose App\Livewire\Demo. 
Working with the Genres Table
Let's begin by querying the genres table, as it's a relatively simple table to start with.
Get All Genres
First, we'll fetch all records from the genres table within our component's render method and pass them to the view.
- Modify the
rendermethod inapp/Livewire/Demo.phpto query theGenremodel. - Pass the resulting
$genrescollection to the view usingcompact(). - In
resources/views/livewire/demo.blade.php, use the<x-itf.livewire-log />component (assuming this is your debug component from the setup chapter) to display the fetched data. Remember to pass the data as a dynamic attribute ( prefixed with:).
php
<?php

namespace App\Livewire;

use App\Models\Genre;
use Livewire\Component;

class Demo extends Component
{
    public function render()
    {
        // Fetch all genres from the database
        $genres = Genre::get();

        // Pass the $genres variable to the view
        return view('livewire.demo', compact('genres'));
    }
}
1
2
3
4
5
6
7
8
9
10
11
12
13
14
15
16
17
18
2
3
4
5
6
7
8
9
10
11
12
13
14
15
16
17
18
Automatic Imports
Start typing Genre in your PHP file. PhpStorm should suggest Genre [App\Models]. Press Enter to select it, and PhpStorm will automatically add the use App\Models\Genre; statement at the top. 
Alternative Query
Fetching all genres can also be achieved using $genres = Genre::all();. The get() method is generally more flexible as it terminates a query builder chain, allowing for methods like orderBy, where, with, etc., to be added before it.
Ordering Genres
Eloquent makes it easy to order query results. You can chain methods like orderBy() (ascending) or orderByDesc() ( descending) before calling get().
- Modify the query in
app/Livewire/Demo.phpto order the genres alphabetically by name.
php
public function render()
{
    $genres = Genre::orderBy('name')->get(); // Fetch genres and order them by the 'name' column

    // Pass the $genres variable to the view
    return view('livewire.demo', compact('genres'));
}
1
2
3
4
5
6
7
2
3
4
5
6
7
Accessors and Mutators
Eloquent allows you to automatically format attribute values when retrieving them (Accessors) or modify values before saving them to the database (Mutators). This is perfect for ensuring data consistency or applying specific formatting rules.
Let's define an accessor and a mutator for the name attribute of our Genre model:
- Mutator (
set): Ensure the genre name is always stored in the database in lowercase. - Accessor (
get): Ensure the genre name is always displayed with the first letter capitalized when retrieved from the model.
These are defined within a single method named after the attribute (in camelCase) that returns an Attribute object.
- Open
app/Models/Genre.php. - Import the
Attributeclass. - Define the
name()method using theAttribute::make()helper.
php
<?php
namespace App\Models;
use Illuminate\Database\Eloquent\Model;
use Illuminate\Database\Eloquent\Casts\Attribute; // Import the Attribute casting class
class Genre extends Model
{
protected $guarded = ['id', 'created_at', 'updated_at'];
// ... relationships ...
/**
* Define an accessor & mutator for the 'name' attribute.
* Method name MUST be camelCase version of the attribute name.
*/
protected function name(): Attribute
{
return Attribute::make(
// Accessor: Called when retrieving $genre->name
get: fn ($value) => ucfirst($value), // Capitalize first letter
1
2
3
4
5
6
7
8
9
10
11
12
13
14
15
16
17
18
19
20
21
22
23
24
25
26
27
28
2
3
4
5
6
7
8
9
10
11
12
13
14
15
16
17
18
19
20
21
22
23
24
25
26
27
28
Loading Related Records (Eager Loading)
We previously defined the relationship Genre has many Records in the Genre model ( public function records() { return $this->hasMany(Record::class); }). Eloquent makes it easy to load these related records along with the genres using eager loading. This helps prevent the N+1 query problem, where you might otherwise run one query to get the genres and then N additional queries (one for each genre) to get their records.
We use the with() method, passing the name of the relationship method (records) as an argument.
- Modify the query in
app/Livewire/Demo.phpto eager load therecordsrelationship. - Update the
resources/views/livewire/demo.blade.phpview to display the genres and their associated records.
php
public function render()
{
    $genres = Genre::orderBy('name')
        ->with('records')               // Eager load the 'records' relationship
        ->get();

    return view('livewire.demo', compact('genres'));
}
1
2
3
4
5
6
7
8
2
3
4
5
6
7
8
Filtering Genres Based on Relationship Existence
Often, you only want to retrieve parent models that have at least one related child model. In our case, perhaps we only want to display genres that actually have associated records. Eloquent provides the has() method for this.
- Modify the query in
app/Livewire/Demo.phpto include only genres that have one or more records, by chaining thehas('records')method.
php
public function render()
{
    $genres = Genre::orderBy('name')
        ->with('records')
        ->has('records')        // Only genres with at least one record
        ->get();

    return view('livewire.demo', compact('genres'));
}
1
2
3
4
5
6
7
8
9
2
3
4
5
6
7
8
9
Working with the Records Table
Now let's shift focus to the records table and apply similar techniques.
Get All Records with Their Genre
We know a Record belongs to a Genre. Let's fetch all records and eager load their associated genre information using with('genre'). We'll also add ordering.
- Modify
app/Livewire/Demo.phpto query records, eager load thegenre, and order them. - Pass the
$recordscollection to the view and the debug component.
php
<?php

namespace App\Livewire;

use App\Models\Genre;
use App\Models\Record;      // Import the Record model
use Livewire\Component;

class Demo extends Component
{
    public function render()
    {
        // Query for Records
        $records = Record::orderBy('artist')    // Order by artist first
            ->orderBy('title')                  // Then by title
            ->with('genre')                     // Eager load the 'genre' relationship
            ->get();

        $genres = Genre::orderBy('name')
            ->with('records')
            ->has('records')
            ->get();

        return view('livewire.demo', compact('records', 'genres'));     // Pass the $records data to the view
    }
}
1
2
3
4
5
6
7
8
9
10
11
12
13
14
15
16
17
18
19
20
21
22
23
24
25
26
2
3
4
5
6
7
8
9
10
11
12
13
14
15
16
17
18
19
20
21
22
23
24
25
26
Adding Computed Attributes to JSON Output ($appends)
Sometimes, it's convenient to have computed or formatted values directly available when your model is serialized to JSON or an array. For example, instead of accessing the genre name via $record->genre->name, we might want a simple $record->genre_name attribute directly on the record object.
This is achieved in two steps:
- Define an accessor for the computed value. The accessor method name must be unique and typically reflects the desired attribute name (e.g.,
genreName()forgenre_name). - Add the
snake_caseversion of the accessor name to the model'sprotected $appends = [];array. This tells Eloquent to include the result of this accessor when the model is serialized.
Let's add a genre_name attribute.
- Open
app/Models/Record.php. - Define the
genreName()accessor method. Inside the accessor, we use thegenre_idattribute (available in the$attributesarray passed to the accessor) to find the correspondingGenremodel and retrieve itsname. - Add
'genre_name'to the$appendsarray.
php
<?php

namespace App\Models;

use Illuminate\Database\Eloquent\Casts\Attribute; // Import Attribute class
use Illuminate\Database\Eloquent\Model;
use Illuminate\Database\Eloquent\Relations\BelongsTo;

class Record extends Model
{
    // Attributes that are not mass assignable
    protected $guarded = ['id', 'created_at', 'updated_at'];

    // Define the "many-to-one" relationship: A Record belongs to a Genre
    public function genre(): BelongsTo
    {
        return $this->belongsTo(Genre::class)->withDefault();
    }

    /**
     * Accessor for the computed 'genre_name' attribute.
     * Calculates the genre name based on the genre_id.
     */
    protected function genreName(): Attribute
    {
        return Attribute::make(
            get: function ($value, $attributes) {
                // Check if genre_id exists in the attributes array
                if (isset($attributes['genre_id'])) {
                    $genre = Genre::find($attributes['genre_id']);
                    return $genre ? $genre->name : null; // Return name or null if genre not found
                }
                return null; // Return null if genre_id is not set
            }
        );
    }

    // Attributes to append to the model's array form.
    protected $appends = ['genre_name']; // Add snake_case name here

}
1
2
3
4
5
6
7
8
9
10
11
12
13
14
15
16
17
18
19
20
21
22
23
24
25
26
27
28
29
30
31
32
33
34
35
36
37
38
39
40
41
2
3
4
5
6
7
8
9
10
11
12
13
14
15
16
17
18
19
20
21
22
23
24
25
26
27
28
29
30
31
32
33
34
35
36
37
38
39
40
41
Adding a Computed Attribute for the Cover Image (cover)
Our records table doesn't store the image path directly, but we know the cover image filename corresponds to the record's mb_id (MusicBrainz ID) and resides in the public/storage/covers directory (assuming you've run php artisan storage:link).
We can create an accessor named cover() that generates the correct public URL for the cover image, falling back to a default "no-cover.png" image if the specific record's cover doesn't exist. We'll use Laravel's Storage facade for this.
- Import the
Storagefacade in the Record model. - Define the
cover()accessor. Inside the accessor:- Check if
mb_idis set. - Construct the expected path within the public disk (e.g.,
covers/mb_id.jpg). - Use
Storage::disk('public')->exists()to check if the file exists. - Return the public URL using
Storage::url()for either the specific cover or the defaultno-cover.png.
- Check if
- Add
'cover'to the$appendsarray.
php
<?php

namespace App\Models;

use Illuminate\Database\Eloquent\Casts\Attribute;
use Illuminate\Database\Eloquent\Model;
use Illuminate\Database\Eloquent\Relations\BelongsTo;
use Storage; // Import Storage facade

class Record extends Model
{
    protected $guarded = ['id', 'created_at', 'updated_at'];
    protected $appends = ['genre_name', 'price_euro']; // Keep previous appends

    // Relationship ...
    // Accessor for genreName ...

    /**
     * Accessor for the computed 'cover' attribute.
     * Returns the public URL for the record's cover image or a default image.
     */
    protected function cover(): Attribute
    {
        return Attribute::make(
            get: function ($value, $attributes) {
                // Ensure mb_id exists in the attributes array
                if (isset($attributes['mb_id']) && $attributes['mb_id']) {
                    $coverPath = 'covers/' . $attributes['mb_id'] . '.jpg';
                    // Check if the file exists in the 'public' disk
                    if (Storage::disk('public')->exists($coverPath)) {
                        // Return the public URL for the cover
                        return Storage::disk('public')->url($coverPath);
                    }
                }
                // Return the URL for the default 'no-cover' image
                return Storage::disk('public')->url('covers/no-cover.png');
            }
        );
    }

    // Add 'cover' to the list of appended attributes
    protected $appends = ['genre_name', 'cover'];

}
1
2
3
4
5
6
7
8
9
10
11
12
13
14
15
16
17
18
19
20
21
22
23
24
25
26
27
28
29
30
31
32
33
34
35
36
37
38
39
40
41
42
43
44
2
3
4
5
6
7
8
9
10
11
12
13
14
15
16
17
18
19
20
21
22
23
24
25
26
27
28
29
30
31
32
33
34
35
36
37
38
39
40
41
42
43
44
Storage Facade Import
Ensure you import the Storage facade correctly: use Illuminate\Support\Facades\Storage; (or the shorter alias use Storage;).
Updating the View to Display Records
Now that our Record model provides convenient computed attributes (genre_name, cover), let's update the Demo component's view to display the records in a card format.
- Open
resources/views/livewire/demo.blade.php. - Add a loop to iterate over the
$recordscollection. - Inside the loop, create a card structure (e.g., using Flexbox and divs).
- Display the record's data using the model attributes, including our appended ones:
$record->cover,$record->artist,$record->title,$record->genre_name,$record->price. - Add conditional logic to show the stock (
$record->stock) or a "SOLD OUT" message.
php
<div>
    <x-slot:title>Eloquent Models: Part 2</x-slot:title>

    <h2 class="font-bold text-xl my-4">Records</h2>
    <div class="grid grid-cols-1 xl:grid-cols-2 gap-4">
        @foreach ($records as $record)
            <div class="flex gap-4 shadow-md border border-zinc-300 dark:border-zinc-800 dark:bg-zinc-700 rounded-lg p-4 ">
                <img src="{{ $record->cover }}" alt="" class="w-48">
                <div class="flex-1 relative space-y-2">
                    <p class="text-lg font-medium">{{ $record->artist }}</p>
                    <p class="italic text-right pb-2 mb-2 border-b border-gray-300">{{ $record->title }}</p>
                    <p>{{ $record->genre_name }}</p>
                    <p>Price: {{ number_format($record->price, 2) }} €</p>
                    @if($record->stock > 0)
                        <p>Stock: {{ $record->stock }}</p>
                    @else
                        <p class="absolute bottom-4 right-0 -rotate-12 font-bold text-red-500">SOLD OUT</p>
                    @endif
                </div>
            </div>
        @endforeach
    </div>

    <h2 class="font-bold text-xl my-4">Genres with Records</h2>
    <div class="grid grid-cols-1 lg:grid-cols-2 gap-4">
        @foreach ($genres as $genre)
            ...
        @endforeach
    </div>

    <x-itf.livewire-log :records="$records" :genres="$genres"/>
</div>
1
2
3
4
5
6
7
8
9
10
11
12
13
14
15
16
17
18
19
20
21
22
23
24
25
26
27
28
29
30
31
32
2
3
4
5
6
7
8
9
10
11
12
13
14
15
16
17
18
19
20
21
22
23
24
25
26
27
28
29
30
31
32
Compact Stock Display (Alternative)
The conditional if/else for stock is very readable. If you prefer a more compact inline version using a ternary operator, you could do something like this (though readability might decrease):
php
{{-- Alternative compact stock display --}}
<p class="{{ $record->stock > 0 ? 'text-sm text-gray-600' : 'absolute bottom-0 right-0 transform -rotate-12 bg-red-100 text-red-600 font-bold px-2 py-1 text-xs rounded shadow' }}">
    {{ $record->stock > 0 ? 'Stock: ' . $record->stock : 'SOLD OUT' }}
</p>
1
2
3
4
2
3
4
Choose the style that best suits your preference for clarity.
Query Scopes for Reusable Constraints
Imagine you frequently need to filter records based on a maximum price. You could add ->where('price', '<=', $maxPrice) to every query in your components, but this leads to code duplication. Eloquent's Query Scopes allow you to define reusable query constraints directly within your model.
Local Scopes are methods in your model prefixed with scope. They allow you to encapsulate common query logic. Let's create a scope to filter records by a maximum price.
First, let's implement the filter directly in the component to see the effect.
- Add a public property
$maxPricetoapp/Livewire/Demo.php. - Add a
whereclause to the records query using this property.
php
class Demo extends Component
{
    // Define a public property for the price limit
    public $maxPrice = 20; // Set default max price

    public function render()
    {
        // Query for Records
        $records = Record::orderBy('artist')
            ->orderBy('title')
            ->where('price', '<=', $this->maxPrice) // Add a where clause to filter by price
            ->get();

        $genres = Genre::orderBy('name')
            ->with('records')
            ->has('records')
            ->get();

        return view('livewire.demo', compact('records', 'genres'));
    }
}
1
2
3
4
5
6
7
8
9
10
11
12
13
14
15
16
17
18
19
20
21
2
3
4
5
6
7
8
9
10
11
12
13
14
15
16
17
18
19
20
21
Now, let's refactor this where clause into a reusable local scope within the Record model.
- Open
app/Models/Record.php. - Define a public method named
scopeMaxPrice. The first argument is always the query builder instance ($query), and subsequent arguments are parameters you want to pass to the scope (like$price). - Inside the scope method, apply the desired query constraint (
$query->where(...)).
php
<?php

namespace App\Models;

// ... other use statements ...
use Illuminate\Database\Eloquent\Builder; // Import Builder

class Record extends Model
{
    // ... properties, relationships, accessors, appends ...

    /**
     * Scope a query to only include records up to a maximum price.
     * Method name starts with 'scope', followed by the desired scope name (e.g., MaxPrice).
     */
    public function scopeMaxPrice($query, float $price = 100): Builder
    {
        // Apply the where clause to the query builder instance
        return $query->where('price', '<=', $price);
    }
}
1
2
3
4
5
6
7
8
9
10
11
12
13
14
15
16
17
18
19
20
21
2
3
4
5
6
7
8
9
10
11
12
13
14
15
16
17
18
19
20
21
IMPORTANT: IDE Helper Generation
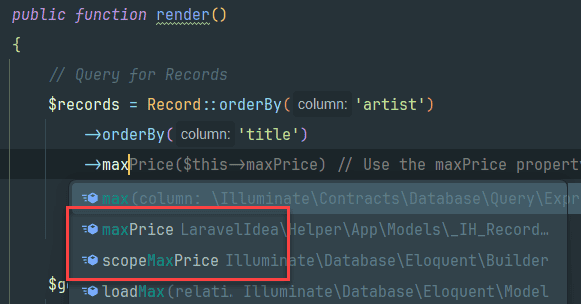
After adding a new scope like scopeMaxPrice, your IDE (PhpStorm) won't automatically know about the maxPrice() method on the query builder.
- Run Laravel > Generate Helper Code again. This updates the helper files, enabling autocompletion and type-hinting for your newly created scope when you chain it in your queries (e.g.,
Record::maxPrice(20)->...).
Adding Pagination
Displaying potentially hundreds of records on a single page isn't practical. Livewire makes implementing pagination straightforward.
- Use the
WithPaginationTrait: Add this trait to your Livewire component class. - Replace
get()withpaginate(): In your Eloquent query, replace the terminating->get()method with->paginate($numberOfItemsPerPage). - Display Pagination Links: In your Blade view, use the
$records->links()method (where$recordsis your paginated collection) to render the pagination navigation links (Previous, Next, page numbers).
- Modify
app/Livewire/Demo.phpto use pagination. - Add pagination links to
resources/views/livewire/demo.blade.php.
php
<?php

namespace App\Livewire;

use App\Models\Genre;
use App\Models\Record;
use Livewire\Component;
use Livewire\WithPagination;   // Import the WithPagination trait

class Demo extends Component
{
    // Include the pagination trait
    use WithPagination;

    public $maxPrice = 100; // Let's increase max price to see more records for pagination
    public $perPage = 4;    // Records per page

    public function render()
    {
        // Query for Records
        $records = Record::orderBy('artist')
            ->orderBy('title')
            // ->maxPrice($this->maxPrice)
            // ->get();                 // Remove get() method
            ->paginate($this->perPage); // Use paginate() instead of get()

        $genres = Genre::orderBy('name')
            ->with('records')
            ->has('records')
            ->get();

        return view('livewire.demo', compact('records', 'genres'));
    }
}
1
2
3
4
5
6
7
8
9
10
11
12
13
14
15
16
17
18
19
20
21
22
23
24
25
26
27
28
29
30
31
32
33
34
2
3
4
5
6
7
8
9
10
11
12
13
14
15
16
17
18
19
20
21
22
23
24
25
26
27
28
29
30
31
32
33
34
Fast Model Overview with Artisan
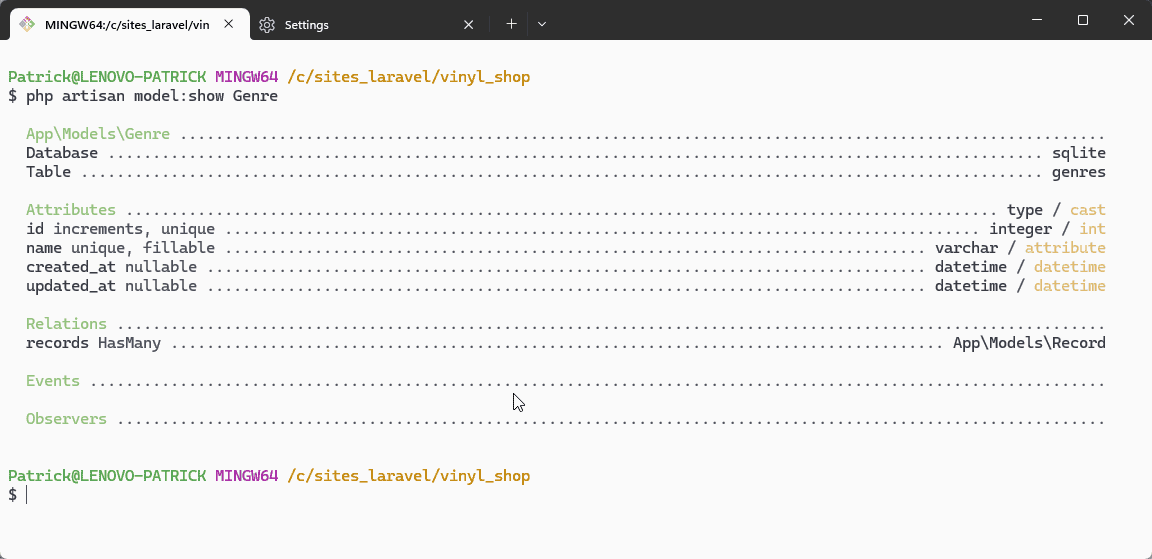
As your models grow with relationships, accessors, scopes, and other properties, it can be helpful to get a quick summary of a model's configuration. Laravel's Artisan console provides a convenient command for this: php artisan model:show <Model>.
- Run this command in your terminal, replacing
<Model>with the name of the model you want to inspect (e.g.,Genre,Record,User).
Doctrine DBAL Dependency
The first time you run model:show, Artisan might prompt you to install the doctrine/dbal package, which is required for inspecting database schema details used by this command.
- Type
yesand press Enter to allow the installation. - Re-run the
php artisan model:show <Model>command after the package is installed.
This command provides a compact overview including:
- Database table name and connection.
- Model attributes (fillable, guarded, hidden, casts, appended).
- Defined relationships (belongsTo, hasMany, etc.).
- Registered query scopes.
bash
php artisan model:show Genre1

This command is an excellent tool for quickly refreshing your memory about a model's structure and capabilities.
Exercise 1
Now, try applying what you've learned:
- In the
DemoLivewire component (app/Livewire/Demo.php):- Set the
$maxPriceproperty back to100. - Change the
$perPageproperty to show8records per page.
- Set the
- In the record display view (
resources/views/livewire/demo.blade.php):- Modify the main
divelement for each record card. Add a conditional CSS class to change its background color ( e.g., to a light red (light mode) and dark red (dark mode)) if the record is sold out.
- Modify the main
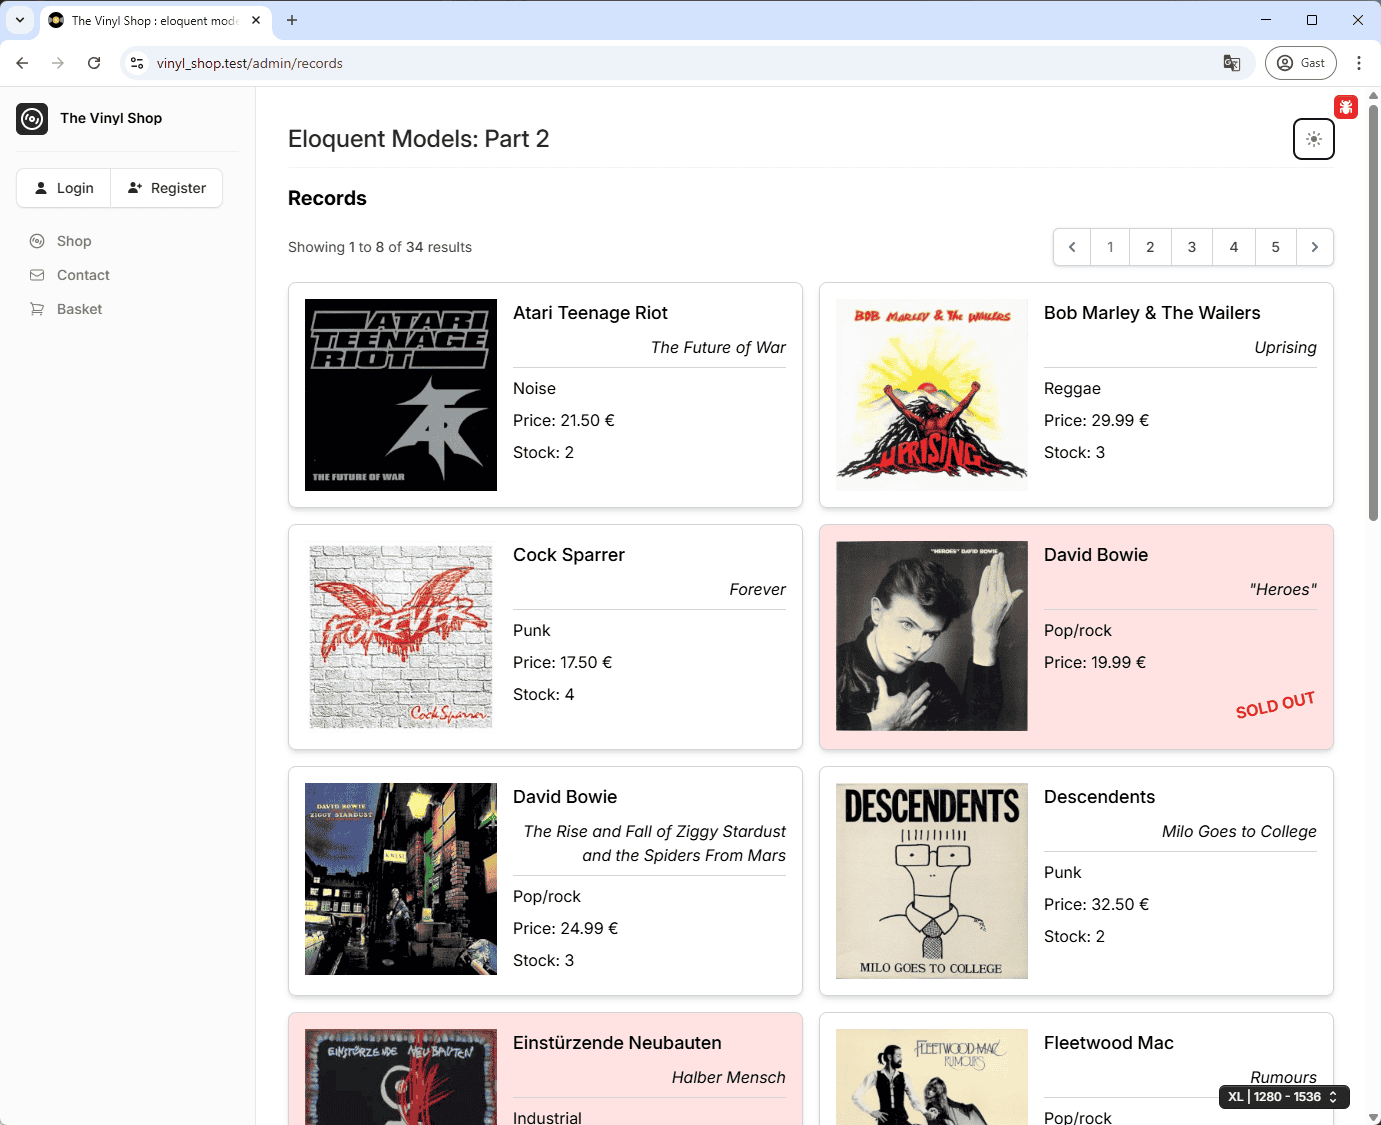
Your result should look something like this, with 8 records per page and sold-out items having a distinct background:

Exercise 2
Enhance the Record model and the view further:
- In the
Recordmodel (app/Models/Record.php):- Create a new appended attribute named
listenUrl. - The accessor for
listenUrlshould return a URL string in the formathttps://listenbrainz.org/player/release/followed by the record'smb_id. - Remember to add
'listen_url'to the$appendsarray.
- Create a new appended attribute named
- In the record display view (
resources/views/livewire/demo.blade.php):- Below the stock information (or "SOLD OUT" message) on each record card, add an icon link.
- Use a suitable icon, for example, the MusicBrainz icon from a library like speaker-wave icon (e.g.,
<flux:icon.speaker-wave variant="solid" class="..." />- adjust class/styling as needed). - Make the icon a link (
<a>) that points to the$record->listenUrl. - Ensure the link opens in a new browser tab (
target="_blank").
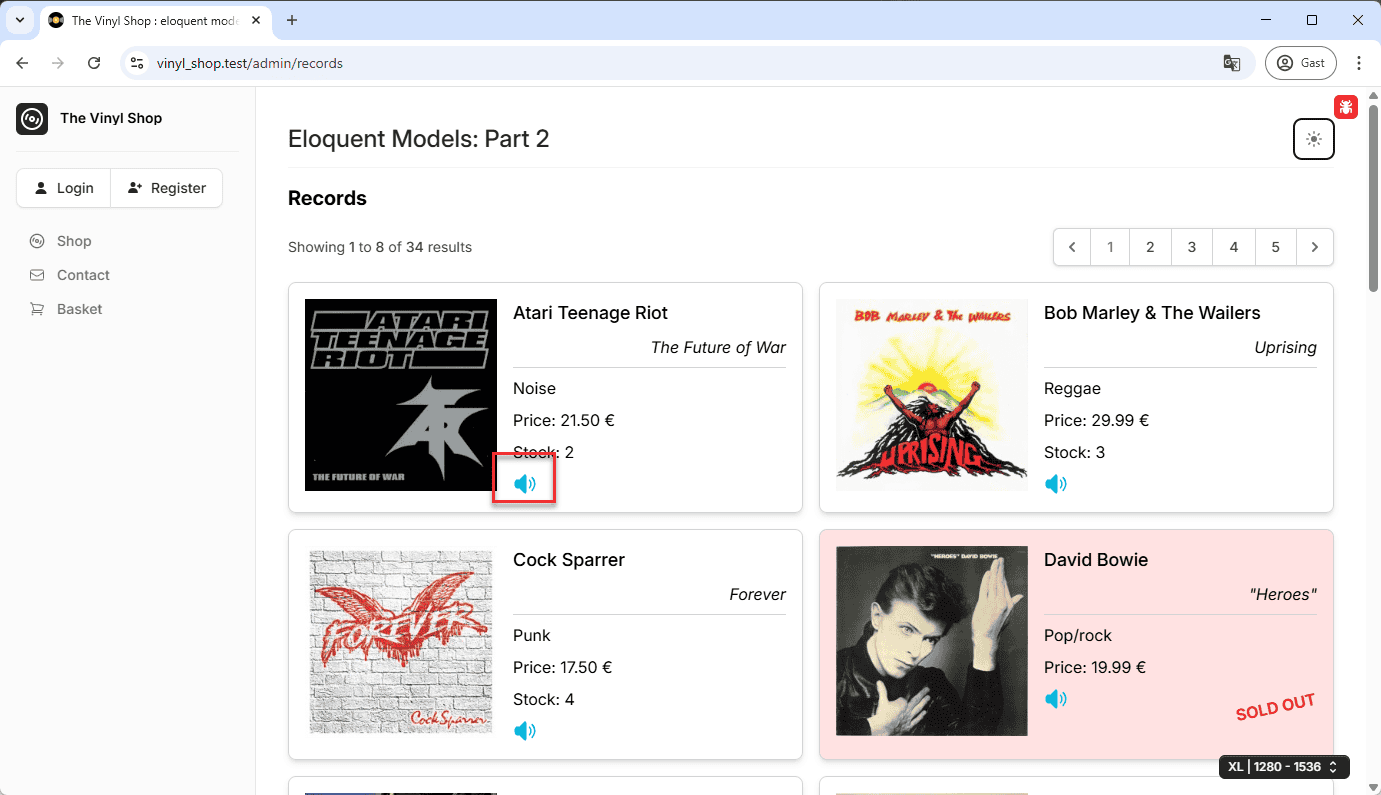
The result should show the icon link below the stock status on each card:
