Appearance
Admin: Order History
Following the creation of the user-facing order history, we now turn our attention to the administrative side. The Admin Order History page is a crucial tool for shop owners, providing a overview of all orders placed on the site. Unlike the user's view, which is filtered to their own purchases, this page will display every transaction, allowing administrators to monitor sales, track fulfillment, and manage customer orders effectively.
We will build a new Livewire component to handle this functionality, presenting the data in a clear "card" format suitable for administrative tasks.
Preparation
Create an Orders Component
First, let's generate the new Livewire component that will power the admin order overview.
- Open your terminal in the project directory.
- Execute the following Artisan command to create a component named
Orderswithin theAdmindirectory:
bash
php artisan livewire:make Admin/Orders1
This command creates the necessary files for our component:
app/Livewire/Admin/Orders.php: The component class for our backend logic and data fetching.resources/views/livewire/admin/orders.blade.php: The Blade view that will render the cards of all customer orders.
Add a New Route
To make this new admin page accessible, we need to add a protected route. This ensures that only authenticated administrators can view the complete order list.
- Open the
routes/web.phpfile. - Inside the
Route::middleware(['auth', ActiveUser::class, Admin::class])->prefix('admin')->group(...)block, add a new route definition that maps the/admin/genresURL path to theApp\Livewire\Admin\Genrescomponent class.
php
Route::middleware(['auth', Admin::class, ActiveUser::class])->prefix('admin')->group(function () {
    Route::redirect('/', '/admin/records');
    Route::get('genres', Genres::class)->name('admin.genres');
    // Other admin routes
    Route::get('orders', Orders::class)->name('admin.orders');
});
1
2
3
4
5
6
2
3
4
5
6
- Now, let's link to this new page from the admin dropdown in the navigation bar.
- Open the
resources/views/components/layout/navbar.blade.phpfile and update the "Orders" link to point to theadmin.ordersroute.
php
@if (auth()->user()->admin)
    <flux:separator variant="subtle"/>
    <flux:navlist.group expandable heading="Admin">
        <flux:navlist.item href="{{ route('admin.genres') }}">Genres</flux:navlist.item>
        {{-- Other admin links --}}
        <flux:navlist.item href="{{ route('admin.orders') }}">Orders</flux:navlist.item>
    </flux:navlist.group>
@endif
1
2
3
4
5
6
7
8
2
3
4
5
6
7
8
Basic Scaffolding for the View
Let's set up the initial HTML structure for the orders table. This will be a more traditional table layout, suitable for displaying a large amount of data for administrators, in contrast to the user-facing card layout.
- Open
resources/views/livewire/admin/orders.blade.phpand replace its content with the following scaffolding.
php
<div>
<x-slot:title>Orders Overview</x-slot:title>
<x-slot:description>Orders overview</x-slot:description>
1
2
3
4
5
6
7
8
9
10
2
3
4
5
6
7
8
9
10
Exercise: Orders Overview
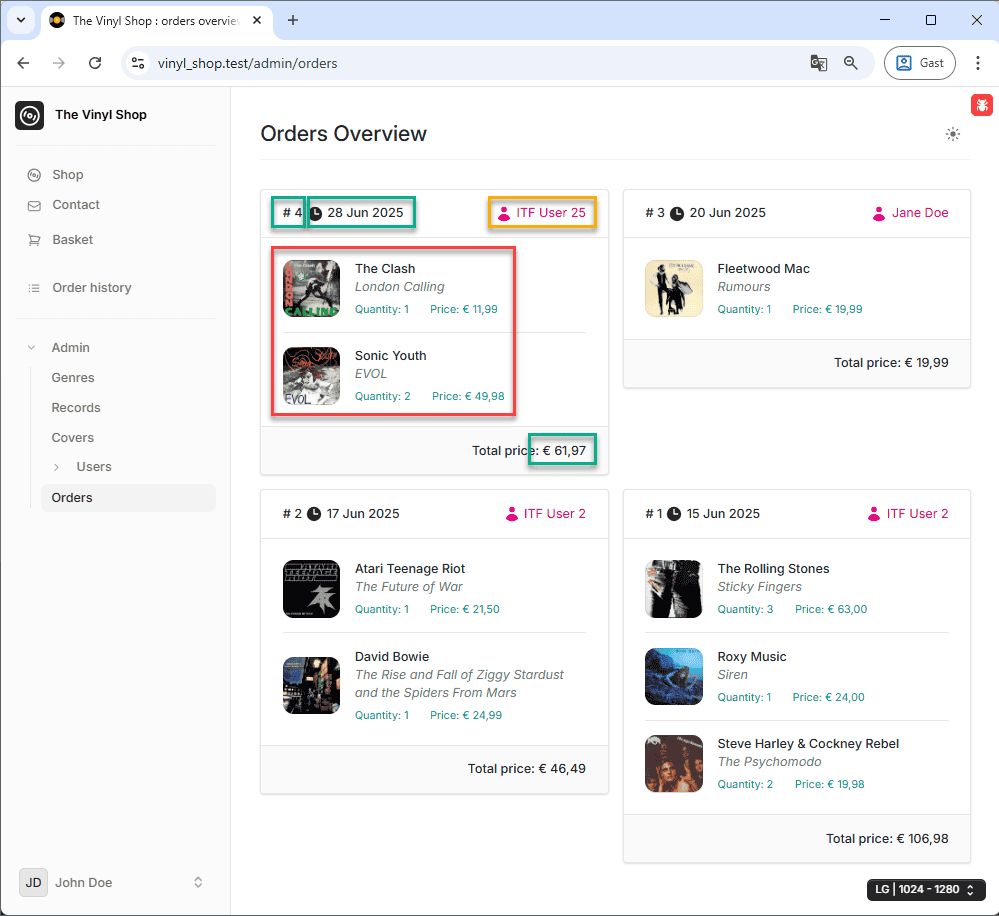
Build the admin-facing order overview page. This page should display all orders from all users in a paginated list of cards, with the most recent orders appearing first.
This exercise is very similar to the user order history page you've already built. You can copy and adapt much of the code, but keep these key differences in mind:
- The query should fetch all orders, not just those belonging to the logged-in user.
- The final result set must be paginated to handle a large number of orders.
- Each order card must display the name of the customer who placed the order.
To accomplish this, you will need to:
- Add pagination to the
Admin/Orderscomponent. - Modify the Eloquent query to fetch all orders along with their related
userandorderlines. - Update the Blade view to loop through the paginated orders and display all the required information, including the customer's name and the formatted order date.
A Note on Data Relationships
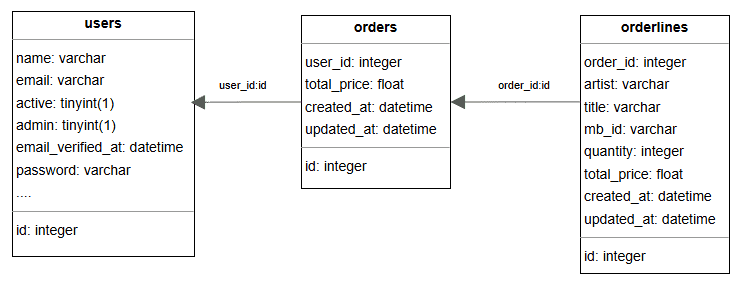
To complete this exercise, you'll need to fetch data from three different tables for each order card: orders, users, and orderlines. Remember to use Eloquent's eager loading capabilities (with()) to do this efficiently and avoid the N+1 query problem.
Your final page should display a card for each order. Pagination links should appear if the number of orders exceeds your specified page size.
Notice that every card you build will contain data from three different database tables:
- orderlines (red) table
- orders (green) table
- users (yellow) table

REMARK
- To make it easier to understand what's happening behind the scenes, you should first make a couple of orders with different users.
- It's important that the last order, which will appear first on the page (e.g., the order with
id = 4marked as # 4), is created with a specific user and contains specific records. For example:- User: ITF User 25 (email:
itf_user_25@mailinator.com, password:itfuser25) - Records: 1 x The Clash - London Calling and 2 x Sonic Youth - EVOL
- User: ITF User 25 (email:
- You already know how to load the
orderlinesrelationship. To get the customer's name, you will also need to load theuserrelationship for each order. You can load multiple relationships at once like this:Order::with('orderlines', 'user')->... - Pay special attention to the date inside the card header! The
created_atproperty is a Carbon object, which allows you to format it easily in your Blade view using theformat()method.
For example, to display the date as "28 Jun 2025", you would use{{ $order->created_at->format('d M Y') }}.
You can find all available formatting options in the PHP date formats documentation.